Saturday, December 3, 2011

Freezer Egg McMuffins

Crappy phone camera- my camera is still in the shop
I'm new to Pinterest.  I have friends who talked about this awesome website that allowed them to find new ideas, be it fashion, food or photo inspiration, but I never went on.  Frankly,  I had way too many internet distractions keeping me from being a fully-functional adult.  Add one more thing and I feared that my kitchen floor would never get mopped. 

But then I caved and peeked.  And fell in love with the site.  What a great way to, like my friends said, get inspired.  Granted, I can already see the possibility of me getting a bit of Pinterest Insecurity Syndrome, a disorder where you're sense of what your world looks like vs what you think your world should look like based on these "pins" you see on your friends "boards" just don't ever match up.

One of my first projects from my Pinterest inspiration came just in time.   We've been having a lot of scrambled mornings where somehow breakfast was last on our minds and in our bellies.  Wednesday, in fact, I was so scattered that I forgot to eat it altogether and spent a very hungry morning testing kids.  Not a good way to focus.  So when I came across this idea for a quick breakfast, you know I pinned it.

The entire process takes about 15 minutes to prep.  Add the hour to freeze (which I will admit I forgot to do completely) and you've got breakfasts for almost 2 weeks.  Well, that's if you want to eat them every day.  I don't think I could stomach that much egg, but I know many who would love it.  Adam, however, was so kind to remind that he does not like eggs when I was making them.  Don't worry, Buddy, I remembered.

Using the muffin tin is brilliant.  It makes the eggs just the right size and shape.  Use cooking spray and they will slip out in perfect shape.  

Here is my Pinterest inspiration.  http://www.macheesmo.com/2010/03/breakfast-sandwiches/


Freezer Egg McMuffins
Makes 12

12 eggs
12 English muffins (I used whole wheat)
Shredded cheese

Preheat oven to 350 degrees.

Spray muffin tin with cooking spray.  Add eggs to each tin.  Bake for 10-15 minutes or until set.

While you are cooking your eggs, split the muffins and lay them on a baking sheet and toast them in the oven. 

When eggs are set, remove from the muffin tin.  Place muffin bottoms on cookie sheet. Assemble shredded cheese and egg on each muffin.  Place completed muffins on the cookie sheet, uncovered, into freezer for 1 hour to remove some of the moisture.  Then wrap each muffin in tin foil or plastic wrap and store in a freezer bag.

To reheat, several suggestions were made.  One is to reheat in an 350 degree oven for about 20 minutes while you're getting ready for work.  Another was if you had to use the microwave to wrap it in a damp paper towel and microwave until defrosted. 

I'd say the oven method is best, but I'm sure the microwave will be tested on those mornings I'm so harried that even turning on the oven escapes my radar. 

Tuesday, November 22, 2011

German Red Cabbage

Photo courtesy of cookin mama via Allrecipes.com
One of the foods that instantaneously brings me back to my mom cooking in the kitchen is her red cabbage.  The smell and taste says Mom.  It's tangy and sweet at the same time and has a bit of spice from the clove and bay leaf.  I could literally eat it all day long and would request it for part of my last supper.  Adam LOVES it so much and calls it "Oma's Purple".

It's chock full of vitamins and is a great way to use up that red cabbage you bought on sale, but had no idea what to make with it.  It goes great with pork and chicken dishes, especially.

If getting a large cabbage, you might have to increase spices, sugar and vinegar.

You really should use whole cloves, peppercorns and allspice berries.  I know many won't have that in their pantry, but it's good to have on hand.  If you absolutely don't want to get the whole berries, I'd use 1/8 teaspoon ground clove, 1/4 teaspoon ground allspice and a good couple of grinds of ground pepper.  Add a pinch more at the end of the cooking if it needs more, but be very careful with these strong flavors!

If you don't have a spice bag or a piece of cheesecloth, just add the whole spices and pick the large pieces out before serving.

German Red Cabbage
Serves 6


1 medium head red cabbage, cored and sliced
2 large tart apples, peeled and sliced
1 medium sweet onion, sliced and separated into rings
1 1/2 cups water
1 cup cider vinegar
1/2 cup sugar
1 tablespoon butter
1 teaspoon salt
6 whole peppercorns
2 whole allspice
2 whole cloves
1 bay leaf
2 teaspoons cornstarch
2 teaspoons cold water


In a Dutch oven, toss cabbage, apples and onion. Add water, vinegar, sugar, butter and salt. Place the peppercorns, allspice, cloves and bay leaf on a double thickness of cheesecloth; bring up corners of cloth and stir with kitchen string to form a bag. Add to Dutch oven. Bring to a boil. Reduce heat; cover and simmer for 1-1/4 hours.
 
Discard spice bag. In a small bowl, combine cornstarch and cold water until smooth; stir in cabbage mixture. Bring to a boil; cook and stir for 1-2 minutes or until thickened.

Monday, November 14, 2011

Pork Schnitzel (German Breaded Pork Chop)

Image courtesy of Google Images


Growing up, I traveled every year to spend my summers in my parent's homeland of Germany.   My mom went to help my aunt take care of my grandmother and I had to tag along.  I'd spend my days holed up in my room, reading book after book or taking the subway to the city's downtown to wander around old palace gardens.  While I didn't necessarily appreciate it then, I am so thankful for these memories.  How many kids get to spend 2 months a year in Europe?  No wonder my mom would shake her head at me when I'd complain to her that I missed hanging out with my friends, drinking Slurpees.

While born and raised in Germany, my parents came to the States during a time when being a foreigner wasn't cool.  So, my mom ended up cooking a lot more American dinners, like broccoli and rice casserole and fish sticks than German classics.  So, each summer, I got to enjoy some delicious cooking. 

This recipe was a favorite when going out to eat and was pretty much the only thing I'd order.  It helped that it was one I could read from the menu, but the delicious flavor and crispy breading won me each time.   It comes with different toppings, my favorite being mushroom sauce.

The trick is make sure you pound the cutlets to make them evenly thin.  If you don't have a meat pounder (...tee hee...), you can use a pan to pound away your frustrations.

I use panko bread crumbs to make an extra crispy breading, but you can use regular crumbs too.

This recipe came from Foodnetwork.com and I made some adjustments.  Serve with buttered egg noodles and cucumber salad.

Pork Schnitzel
Serves 4

4 boneless pork loin chops (about 5 to 6 ounces each)
1 1/2 cups all-purpose flour
Kosher salt and freshly ground black pepper
2 large eggs
1/2 cup milk
4 cups plain dried bread crumbs
2 tablespoons extra-virgin olive oil
2 tablespoons butter
1 teaspoon dried thyme
Lemon wedges

Begin by placing each chop between 2 sheets of plastic wrap and gently pounding them out with the flat side of a meat tenderizer until they are an even 1/4-inch thick.

Put the flour in a shallow dish and season with salt and pepper. Whisk the eggs and milk in another shallow dish and season with salt and pepper. Put the bread crumbs in a third dish and again season with salt and pepper. Lightly dredge each piece of pork in flour, then in the egg and finally into the bread crumbs, pressing the bread crumbs onto the pork gently so they have a nice even coating.


Lay the breaded pork cutlets in a single layer on a plate lined with parchment and refrigerate, uncovered, for 10 to 12 minutes to allow the coating to dry out a little and adhere to the pork.


Heat oil and butter in large nonstick skillet over medium-high heat. Add the thyme to the oil. Gently lay the cutlets into the pan and cook until golden brown and crispy, about 3 minutes per side. Remove to paper towels to drain. Season with salt and transfer to a serving platter while still hot. Garnish with lemon wedges.

Thursday, October 27, 2011

Strawberry Ghost Treats

Sorry about the photo quality.  My camera is broken and this is taken with my phone

Adam is 3 today! Happy Birthday, my big boy!  I can't believe it's been 3 years already since you entered our lives.  Love you so much!

I wanted to make something for Adam's birthday treat for preschool party.  I didn't know if I should do a traditional brownie or cookie.  I know they had restrictions on cupcakes, so that was out.  The teacher mentioned "... and they will even eat fruit", so I ran with it.  I found this on a website and thought it was the perfect little bite since Adam's birthday is so close to Halloween.

They were so easy to make.  The only thing I would suggest is maybe using melted chocolate with a toothpick to draw on the face.  The icing I used was easy to apply, but doesn't dry completely and can smudge easily.  Another suggestion I got was to use edible decorating pens.

Your kids will love helping you make these and even the littlest ones can help.  The real trick is to make sure the strawberries are super dry and room temp when you start, so I'd suggest washing them the night before and letting them dry.  Even then, I dabbed each strawberry before dipping. 

The shortening is crucial to get it to be smooth and shiny, so don't skip it.   And you might need to re-nuke the chocolate once or twice as you're going through the strawberries since it can get a bit clumpy.  I'd stick it in for another 10 seconds when it does that.

Adam's teacher and class loved them!  He did too and looked so proud when bringing them in.  I am for sure going to make them each Halloween.

So, grab some strawberries, some chocolate and get to making some yummy ghosts for this Halloween! 

Oh and the best part is someone has to lick the chocolate bowl clean..... might as well be you!

Strawberry Ghost Treats

1 carton of strawberries
1 11-ounce bag of white chocolate baking chips
1 1/4 teaspoon shortening
Black icing tube, melted milk chocolate chips or edible decorating pen

Put white chocolate in a microwavable bowl with shortening.  Microwave for 10 seconds and stir.  Microwave another 10 seconds and stir.  Continue until chocolate is melted and smooth.

Dip dried strawberry in melted chocolate 3/4 the way up. Set down on a cookie sheet that has been covered with waxed paper.  Let the chocolate trail off to make the ghosts tail.  Freeze 5 minutes or allow to air dry. 

Paint on face. 


Monday, October 17, 2011

20 Dinners, 1 Day: Mediterranean Chicken Salad Pitas

Photo courtesy of Rachael Ray Magazine

I typically am not a chicken salad kind of gal.  Nothing against them, but my family just doesn't beg for them, so they never come onto the menu.  After making this one, I definitely can see adding chicken salad sandwiches to my attempt to switch up the same-old , same-old lunch.

Abe really enjoyed this, while Jimi was so-so on it. It had the dreaded roasted pepper in it, so I'm surprised he even tried it (he did pick out every single pepper, just to let you know).

Pocketless pitas are different than pita bread, which is thinner and has a pocket (I know, I know, I'm such a smarty one, aren't I).  It's similar to a flat bread... thicker and fluffy.  Yumminess.  I find mine in the baking section of the grocery store.

Mediterranean Chicken Salad Pitas

4 pocketless pitas 
3 cups Pulled Chicken 
1 cup chopped Roasted Peppers, chopped 
1 large tomato, seeded and diced 
1 cucumber—peeled, seeded and diced 
1/4 cup minced red onion 
2 tbsp. extra virgin olive oil
1 tbsp. red wine vinegar 
Salt and pepper 
4 romaine lettuce leaves

Place pitas in stack in 350° oven to warm. In large bowl, combine chicken, peppers, tomato, cucumber, onion, olive oil, vinegar and 1/2 tsp. each salt and pepper. Toss well. Top each pita with a lettuce leaf, fill with chicken salad and fold to enclose.

Tuesday, October 11, 2011

20 Dinners, 1 Day: Rigatoni with Apple and Squash


I had been looking forward to doing this one.  I love pasta, even though I don't make it nearly as much as I should.  Plus, add butternut squash to the mix and I'm there.

The bacon was tricky for this vegetarian.  I was originally going to make the recipe and add bacon just to Abe's portion.  But a recent cholesterol check made adding it maybe not such a good idea (he's had high cholesterol since his 20s, even though he's pretty fit).  So I improvise with using a bit of liquid smoke in olive oil to add some smoky flavor.

If you're not dealing with high cholesterol, I'd recommend using the bacon, though.  :)

The dish was very yummy and it was extra good the next morning for breakfast.  Hey, it was Adam's idea.  He did balance things out by having waffles and syrup for lunch that day.

The butternut adds a bit of sweetness and the apples and onions add the savory.  But I think the cheese makes the dish delicious, so don't skip it.  Not that I thought you would.

I didn't do the sage leaves this time because I didn't have them.  So, I sprinkled about 1/2 teaspoon of dried sage into the butter.  The idea of fried herbs intrigues me, so I will try it next time.

Rigatoni with Apple and Squash
  
1 lb. rigatoni pasta 
8 oz. bacon, thinly sliced 
10 sage leaves 
2 shallots, minced 
1 tart apple, sliced 
3 cups Roasted Squash, chopped 
1/2 cup grated Parmesan cheese 
Salt and pepper 
1/4 cup chopped fresh parsley

Cook pasta until al dente. Drain, reserving 1 cup cooking water. In same pot, cook bacon until just crisp; transfer to paper towels. Add sage to hot bacon fat and cook until crisp, 2 to 3 minutes. Transfer to plate. Add shallots and apple and cook, 5 minutes. Add pasta, squash, cooking water, bacon and parmesan; season with salt and pepper and toss. Top with crumbled sage and parsley.

Thursday, October 6, 2011

20 Dinners, 1 Day: Mexican Chicken and Rice Soup

Photo courtesy of rachelraymag.com
Boy, time slipped away from me (an entire month, to be exact!).  I've been doing the cooking part, but the sitting down to blog part has been evading me.  I do apologize!

I cooked this one up after Jimi's football practice when he was cold and wet.  He's not much of  soup kid, but he did like it.  Abe ate his portion (and the left overs from Jimi's bowl) and declared it to be a tasty treat. 

I'd say this would make an especially good lunch.  It seemed a bit light for a dinner, so if you make it, maybe pair it with a hearty salad or as a first course for your Mexican dinner.

I can see making this the day after you have any leftover chicken and some extra rice (I'm going to start freezing my extra rice for things like this).


Mexican Chicken and Rice Soup

1 qt. chicken broth 
1 cup tomato salsa 
1 1/2 cups Pulled Chicken 
3 cups Rice Pilaf 
1/3 cup shredded Monterey Jack 
1/4 cup sour cream 
1 avocado, thinly sliced 
2 tbsp. chopped cilantro1/4 cup fresh lime juice, plus 4 lime wedges


In medium pot, bring broth, salsa and lime juice to boil. 

Divide chicken and pilaf among 4 bowls. Fill each bowl with hot broth. Top with cheese, sour cream, avocado and cilantro. Serve with lime wedges.

Wednesday, September 7, 2011

20 Dinners, 1 Day: Creamy Chicken with Soft Polenta

Photo courtesy of Rachel Ray Magazine

Another first in this household (who knew Rachel Ray would be introducing so many firsts to me?), I've never served polenta.  Well, I take that back.... I tried a long time ago, but the only polenta I could find was the kind in the tube that looks like cut and bake cookies.  It was... um, weird.  And I didn't even bother to serve it to the family because I knew they wouldn't touch it.  But I saw a cooking show once that talked about instant polenta (which is basically corn meal), so I thought I'd give that one a try.

It was so yummy that I'm hooked.  Granted, what made is so yummy, namely heavy cream and lots of cheese, isn't so figure-friendly, so I'm going to have to watch how often I serve it up.  But wow, it was delicious!  I even had the leftovers for my lunch today and served cold bits of it to Ava for breakfast.  She gobbled it up.

Abe really liked this recipe, polenta and all.  I suspect that it's very similar in flavor to a chicken pot pie, minus the crust.  Just creamy and yummy and good.  And like all of the 20 dinners, it came together in a snap.

The fontina can be found in the deli cheese area.  It melts down into a cream, so it's perfect for something like this.  It adds a wonderful flavor, too.

Creamy Chicken with Soft Polenta
  
1 onion, minced 
3 tbsp. butter 
10 oz. sliced cremini (or baby bella or button mushrooms)
2 tbsp. flour 
1 1/2 cups heavy cream 
2 cups Roasted Squash, chopped 
1 1/2 cups Pulled Chicken 
1 cup peas 
Salt and pepper 
1 cup instant polenta
1 cup fontina cheese, chopped

In 12-inch skillet, cook onion in 2 tbsp. butter. Add mushrooms and cook until tender. Stir in flour for 1 minute. Pour in 1 1/4 cups cream and simmer 2 minutes. Stir in squash, chicken and peas; season with salt and pepper. Set aside. Cook polenta in 3 1/2 cups boiling water with 1/2 tsp salt until thickened, 2 minutes. Stir in remaining 1/4 cup cream, 1 tbsp. butter and fontina until smooth. Serve chicken over polenta.

Tuesday, September 6, 2011

20 Dinners, 1 Day- Pulled Pork and Slaw Sandwiches

Photo courtesy of Rachel Ray Magazine


Wondering if Abe would like these pulled pork sandwiches is like wondering if Adam would like to watch Elmo.  I would've taken my own picture of the meal, but Abe's mitts were all over it in a nanosecond.

Not much to write except that this is for sure a new go-to quicky "what the heck do I make for dinner tonight??" meal.  Abe loved it so much that he replicated the slaw the next day just to snack on.

Pulled Pork and Slaw Sandwiches

3/4 cup cider vinegar
2 teaspoons sugar
1/2 teaspoon crushed red pepper
2 1/2 cups coleslaw mix (7 ounces)
salt and pepper
2 tablespoons mayonnaise
3 cups Pulled Pork
1 tablespoon worcestershire sauce
4 hamburger buns

In a large bowl, whisk together 1/2 cup vinegar, sugar and crushed red pepper; add coleslaw and season with 1/2 teaspoon each salt and pepper.  Toss and let stand at least 15 minutes.  Pour off liquid and stir in mayonnaise. 

In saucepan, cook pork and remaining 1/4 cup vinegar, worcestershire sauce and 2 tablespoons water over medium heat to heat through, 2 to 3 minutes.  Divide pork among buns, top with some slaw and serve remainder alongside.

Wednesday, August 31, 2011

20 Dinners, 1 Day: Easy Brunswick Stew


I have no idea what Brunswick Stew is and have never heard of it before.  Whatever it is, it was such an easy and tasty stew that Abe had to pack his lunch portion pretty quickly or it would've been eaten up that night.

Using bagged frozen veggies made it crazy quick to make.  Abe actually questioned what kind of stew only needed 10 minutes to cook when he called to tell me he was on his way home from golf league and I told him I had to start the stew.  I admit, I wondered too.    But it was surprisingly good!  And talk about healthy.... I don't think you can cram anymore vegetables in there if you tried.  I sectioned off 1/2 of the stew before adding the pork for myself and added the pork to Abe's portion.  So tasty!  You could easily substitute chicken or even omit the meat altogether for a hearty vegetarian meal.

Oh and don't be a ding dong like me and look for the frozen combo of ALL of the veggies.  I spent a good 5 minutes looking through the freezer section for this elusive blend.  Only later when home did I reread the ingredients and realize it asked for bags of EACH veggies.  Duh.

Easy Brunswick Stew

1 onion, finely chopped
2 tablespoons olive oil
2 cups Pulled Pork
1 package (10 oz) each frozen corn, baby lima beans, sliced okra and peas-and-carrots combo, thawed
2 cups Tomato Sauce
2 cup beef broth (I used vegetable broth)
salt and pepper
4 slices crusty bread

In a large dutch oven (or pot), cook onion in olive oil over medium heat until tender, 5 minutes.  Add pork and cook 1 minute.  Add thawed vegetables, tomato sauce and broth.  Cover and simmer until vegetables are tender, 5 minutes.  Season with salt and pepper.  Serve with bread.

Monday, August 29, 2011

20 Dinners, 1 Day: Veggie Flatbreads with Hummus

I think I've found my new go-to dinner when things are harried and I haven't even thought about what to make for dinner.  Even Abe commented on how yummy these were and how quick of a dinner it makes.  I have a feeling once the school year/football practice season is in full swing,  I'll be cranking out a lot of these in different variations.

Who knew that hummus on pizza crust was so tasty?  Well, I guess Rachael Ray did since this is her recipe.  But honestly, who knew?  Abe did raise an eyebrow at the idea. Being Middle Eastern himself, I know he was thinking I was going to ruin a perfectly good hummus.   But, one bite, and he was sold.

I found the flatbreads in the bakery section.  If you can't find them, pocketless pitas will do too.

You might also think "Um, butternut squash and fennel on my pizza? Are you crazy?"  But I assure you, it's actually good.  The peppers and onion add just enough flavor to tone down the sweetness of the butternut and the fennel adds a nice twist, so it's a perfect compliment.  And, don't skimp on the olives.  Yum.

Veggie Flatbreads with Hummus

1 small fennel bulb, shaved
3 tablespoons olive oil
4 naan, flatbread or pocketless pitas
3/4 cup hummus
1 cup chopped Roasted Squash
1 cup chopped Roasted Peppers
1/4 cup chopped black olives
3 tablespoons chopped fresh parsley

Place racks in upper and lower thirds of oven and preheat to 500 degrees.  In bowl, combine fennel and 1 tablespoon olive oil.  Brush naan on both sides with remaining 2 tablespoon olive oil; place on 2 baking sheets.  Spread 3 tablespoon hummus on each naan; divide fennel among naan.  Bake until toasted, 10 minutes.  Sprinkle with squash, peppers, olives and bake until crisp, 5 minutes.  Top with parsley.

Wednesday, August 24, 2011

20 Dinners, 1 Day: Butternut Squash and Spinach Strata


I know, I didn't know what a strata was either.  I had to look it up.  It's just a layered dish that usually has egg, cheese and bread.  I'm guessing it is called strata since strata means layers of something, like rock.

This dish was pretty good.  I wouldn't say that it was my favorite, but that's because I'm not the fondest of eggs.  If you like things like quiche or fritattas, you will like this one.    I do have to say that I loved the flavor of the butternut and spinach.  And it was extra good the next day, after the bread and cheese had time to really settle.  I'd almost say that you might want to make this the night before and really warm it up in the oven at dinnertime.

I'd say this dish could've used a bit of garlic and maybe even a bit of heat, like a shaking of red pepper flakes.  But I'm going to post it in its original form and let you decide.  After all, not everyone has an eggy aversion like I do and might like it, as is.

We don't eat white bread (I know, Jimi hates it with a vengeance), so I just bough some cheap $.79 loaf of bread.  It was ok, but I think next time I will use a nice french bread or something with some more flavor.  Hmmmm... that might be a good place to throw in some garlic oil or minced garlic. 

A neat trick to squeeze the liquid out of the spinach is to put it on a dinner plate, place another plate on top and then press the plates together over the sink. 


Butternut Squash and Spinach Strata

4 cups (4 oz.) torn white sandwich bread
1 tablespoon olive oil
2 cups Roasted Squash, coarsely chopped
1 1/2 cups shredded monterey jack 
1 lb. frozen spinach, thawed and squeezed dry (see tip above)
6 large eggs
1 1/2 cups whole milk
salt and pepper


In 8-inch square baking dish, toss together the bread and olive oil.  Top with squash; sprinkle with 3/4 cup of cheese.  Add spinach and remaining 3/4 cup cheese in layers.  In bowl, beat eggs, milk, 3/4 teaspoon salt and 1/4 teaspoon pepper with fork.  Pour into baking dish; let stand 10 minutes while you preheat oven to 400 degrees.  Bake until set in center, 40 to 45 minutes.  Let cool for 5 minutes before serving.

Monday, August 22, 2011

20 Dinners, 1 Day: Pasta with Chicken and Tomato Sauce


Onto dinner #3 with my 20-Dinner plan.  This time around, I wasn't nervous about Abe liking it..... I was nervous about Jimi eating it.  He, as many kids can be, tends to be a bit fussy.  He's not into "fancy eating" and doesn't like a list of things.  So, a lot of time, I save my food experiments for the days he's not with us.  Pasta would seem like a sure-fire winner, but it was the chicken that worried me.  I don't make pasta with meat, especially shredded chicken, so I wondered how he'd like it.

Both he and Abe loved it and ate 2 servings each.  I had managed to scoop out a bit before adding the chicken, so I can attest that it was tasty.  The sauce was delicious and the cheese added a nice yumminess to an already yummy dish.

I was supposed to use fusilli, but couldn't find it at the store, so I substituted rotini.  I accidentally used the monterey jack from another pending recipe in the dish... I threw in some of the mozzarella when I realized my mistake.  It still was tasty and we couldn't tell a difference at all.

Oh and excuse the horrible picture.  It was 9:30 at night and I was trying to get a pic quickly before the boys came up to devour their dinner.  I'll have to try to get a better picture the next time I make it.

Pasta with Chicken and Tomato Sauce

1 box (16 oz) pasta, like fusilli or rotini
2 tablespoons butter
3 cups Pulled Chicken
2 cups Tomato Sauce
6 oz. mozzarella
salt and pepper
1/3 cup grated parmesan
1/4 cup chopped fresh parsley

In a large pot of boiling, salted water, cook pasta until al dente.  Drain, reserving 1/2 cup cooking water.  Return pasta to pot, add butter and place over medium heat.  Add chicken and tomato sauce and toss well.  Add reserved pasta water and mozzarella; season with salt and pepper.  Top with parmesan and parsley.

Thursday, August 18, 2011

20 Dinners, 1 Day- Mango, Pork and Watercress Salad


After a successful first day to the 20 dinner project, I was a bit hesitant about the recipe for Day 2.  It was a salad, and while Abe is a salad eater, it had things in it that I know he's not that fond of.... mango (he doesn't like fruit in his salad), watercress and shallots.  But, hey, I told him at the beginning of this that he's eating what's on the menu this month, so I slid the bowl in front of him with a broad smile on my face. 

And then I held my breath....

He liked it!  (you old folk will remember the Mikey commercials).   He said the pork really made the dish.  I might start making extra when I make pulled pork and freezing a bit for future salad nights.  My man likes a bit of protein with his greens.

I couldn't find watercress anywhere, so I went with arugula, which has a nice peppery bite to it.  I will try it with the watercress next time.

I'd taste the salad after mixing it to see if it needs a bit more dressing.  It's dressed pretty lightly, which some like, but Abe thought it could've used a smidge more.

Oh and another dinner done in 10 minutes or less.  Take that, long work commute.

I used Building Block #1 (pulled pork) in this recipe.

Mango, Pork and Watercress Salad

1 tablespoon fresh lime juice
1 1/2 teaspoon honey
2 tablespoon olive oil
Salt and pepper
1 cup pulled pork
7 cups watercress (or arugula), 5 ounces
1 mango, thinly sliced
1 red bell pepper, thinly sliced
1 shallot, thinly sliced
1/2 cup sliced almonds, toasted

In large salad bowl, whisk together lime juice and honey.  Whisk in olive oil; season with 1/4 teaspoon salt.  Add pork and toss.  Add watercress, mango, bell pepper and shallot; season with salt and pepper.   Toss, then sprinkle almonds on top.

Wednesday, August 17, 2011

20 Dinners, 1 Day- Spanish Rice with Shrimp


So, after a full afternoon of prep cooking, I was interested to see what the fruit of my labors would be.  I mean, supposedly, this was going to save me a ton of time during the week.  We'll see....

Um, dinner was done in 10 minutes.  And I think that was because I dragged it out since Abe had gone to shower after cutting the lawn, thinking he had plenty of time.  So, if it hadn't been for that, I think I would've been done in 5 minutes.  Abe even commented that dinner was finished in quicker time than it took him to clean up afterward.


Dinner, done, in 5-10 minutes?  Yes, please, sign me up.  And it was delicious.  Abe's not a shrimp fan, but he really liked it (ate 2 servings, plus the leftover off of Adam's plate... so that is a thumb's up).  So, if you're a seafood fan, you'll like it even more. 

It utilized 3 of the building blocks... rice pilaf (#5), roasted veggies (#3) and tomato sauce (#2).  Recipes in the intro..

Easy peasy (I know, only dorks say easy peasy.  I am comfortable with that).
 

Spanish Rice with Shrimp

4 cups Rice Pilaf
1/4 cup olive oil
4 cloves garlic, chopped
1 lb. peeled, devined shrimp
1 teaspoon smoked paprika
1 cup Tomato Sauce
1 cup chopped Roasted Peppers
1/4 cup chopped black olives
3 tablespoons chopped fresh parsley
4 lemon wedges


In a large skillet, heat pilaf in 2 tablespoons olive oil.  Transfer to bowl.  In same skillet, cook garlic, shrimp and paprika in remaining 2 tablespoons olive oil.  Add tomato sauce and peppers and heat through.  Return pilaf to pan, stir in olives and cook 1 minute.  Serve with parsley and lemon wedges.

Tuesday, August 16, 2011

Twenty Dinners, One Day- The Prep Work


When I saw this plan in my Rachael Ray magazine this month, the butterflies of excitement started welling up.  20 meals, all cooked in 1 day?  That's a month of weekday dinners!  Both insanity and thrilling at the same time.  Well, about as insane and thrilling as cooking can be. 

It's not technically 20 dinners exactly, but in one day you do the major prep work for 20 meals to be made later.  It's simple.... you make the "building blocks" in one day, freeze them in small servings and then use them in various recipes that month.  Sort of like the articles in Cosmo where the headline is "20 Outfits from 5 pieces!" and they show you how you can put Shirt A with Top E, add a belt and it looks completely different than Skirt A with Top C.

Do people even still read Cosmo anymore?  You get my point, though.....

Today I did the prep work and I will tell you, plan on having an entire Saturday or Sunday available.  You won't be working the entire time, but you need to be near the kitchen to monitor stuff.  It does take a bit of organization and doing one thing on the stove top while another thing is cooking in the oven.  But overall, the process was pretty easy.

I won't list the entire group of recipes, but they include many different cultural flavors... including Mexican, Italian, Mediterranean and Asian.  Each recipe is a simple combination of the Building Blocks you made in that one day, pulled from the freezer that morning, with some extras from your pantry (or, as in my house, the shelves by the dryer) or from the store.  Most recipes are supposed to take around 20 minutes to make.

Now, wouldn't 1 month's worth of dinners done in around 20 minutes (some even less!) make that one Sunday where you cooked all day, while listening to your favorite tunes and drinking your favorite wine (or again, in my house, listening to your toddler ask what you're doing and if they can have yet another snack and drinking cold coffee that you put down somewhere and forgot about it)?

How I'm going to do this is this entry will be the Building Block recipes and tips on how to do it efficiently.  Then I will blog each of the 20 recipes, unless they are horrendous and don't deserve mention on this blog.  Each Building Block recipe will be labeled with a number, for easier reference when cooking later.

Here is a list of the recipes that will be created with the building blocks:

Spanish Rice with Shrimp (#2, 3 & 5)
Mango, Pork and Watercress Salad (#1)
Fusilli with Chicken and Tomato Sauce (#2 & 4)
Pork and Avocado Tacos (#1)
Butternut Squash and Spinach Strata (#3)
Easy Brunswick Stew (#1 & 2)
Veggie Flatbreads with Hummus (#3)
Lemon Chicken Frittata (#4 & 5)
Pulled Pork and Slaw Sandwiches (#1)
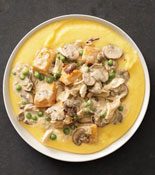
Creamy Chicken with Soft Polenta (#3 & 4)
Pork and Ginger Noodle Soup (#1)
Cheesy Spinach and Pepper Calzones (#2 & 3)
Pork Fried Rice (#1 & 5)
Swiss Chard with Bacon and Eggs (#3)
Roast Pork with Veggie Burritos (#1, 3 & 5)
Warm Chicken Salad (#4)
Pork Chilaquiles (#1 & 2)
Mediterranean Chicken Salad Pitas (#3 & 4)
Rigatoni with Apple and Squash (#3)
Mexican Chicken and Rice Soup(#4 & 5)

For each Building Block, you will need plenty of resealable sandwich bags and 2-gallon freezer bags.

Building Block #1- Pulled Pork
Makes about 15 cups
Prep- 15 minutes (plus standing)   Roast- 2 1/2 hours

2 boneless pork shoulder roasts (about 5 lbs each), cut into 2-to-3 inch chunks and excessive fat discarded (I used pork shoulder blade roast and just pulled bone out at end)

6 cloves garlic, finely chopped

2 lemons, zested

Salt and pepper

1/2 cup white wine (optional)

1. Position racks in the upper and lower thirds of the oven and preheat to 450 degrees.  Place all of the pork in a large roasting pan.  Sprinkle with the garlic, lemon zest, 1 tablespoon salt and 1 1/2 teaspoon pepper.  Toss well, massaging the garlic and zest into the meat.  Transfer half of the pork to a large rimmed baking sheet and place both the roasting pan and baking sheet in the oven.  Roast until the meat is browned on top, about 30 minutes.  Turn the pork chunks over and roast to brown the other side, 15 minutes.  Remove both pans from the oven and lower the oven temperature to 325 degrees.

2. Using tongs, transfer the pork from the baking sheet to the pork in the roasting pan.  Pour the pan juices from the baking sheet over the pork and add the wine (if using).  Tightly cover the pan with foil.  Continue roasting the pork until nicely tender, about 1 hour, 45 minutes.  Meanwhile, wash and dry the baking sheet and set aside.

3. Let the pork cool for at least 15 minutes, then, using 2 forks, shred it a few pieces at at time.  As you work, transfer the shredded pork to the clean baking sheet and let cook completely.  Pour the juices into a bowl to cool.  Skim and discard the fat.

Freeze it!  Divide the pork into 1-cup portions and transfer to resealable sandwich bags.  Pour a bit of the pork juices into each, squeeze out the air and flatten.  Seal and store flat in 2-gallon freezer bags.


Building Block #2-  Tomato Sauce
Makes about 10 cups
Prep- 10 minutes  Cook- 2 1/2 hours

1/4 cup olive oil
8 cloves garlic, smashed and peeled
6 oil-packed anchovy fillets, chopped (optional)
1/4 teaspoon crushed red pepper
1 cup red wine (2 cups for a more intense sauce)
4 cans (28 oz. each) or 3 cans (35 oz. each) crushed tomatoes (the recipe called for san marzano tomatoes, but I couldn't stomach paying the extra price.  If you can, go for it)
Salt

1.  In a 5-to-6 qt. heavy dutch oven (or pot), combine the olive oil, garlic, anchovies (if using) and crushed red pepper.  Cook over medium heat, stirring constantly, until the garlic is golden and the anchovies fall apart, 3 to 4 minutes.  Pour in the wine, then add the tomatoes.  Increase the heat to high and bring to a boil, stirring occasionally, about 10 minutes.

2. Lower the heat, partially cover and simmer, stirring occasionally, until the sauce is thick and reduced by one-third, about 2 hours, 15 minutes.  Season with salt (and with a pinch of sugar if it needs some sweetness).  Let the sauce cool completely.

Freeze it!  Store in 1-and 2- cup containers. (You'll need at least two 1-cup containers)


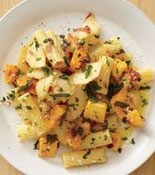
Building Block #3- Roasted Vegetables
Makes about 16 cups
Prep- 25 minutes  Roast- 30 minutes

4 lbs. bell peppers (10-12 medium, in mixed colors), cut into 1-inch strips
2 large onions, halved and sliced 1/2 inch thick
3 cloves garlic, minced
Salt and pepper
5 tablespoon olive oil
1 large butternut squash (4 to 4 1/2 lbs.)- peeled, seeded and cut into 3/4-inch cubes (about 8 cups)

1.  Position racks in the upper and lower thirds of the oven and preheat to 450 degrees.  Combine the bell peppers and onions on a large rimmed baking sheet.  Sprinkle the garlic, 1 teaspoon salt and 1/2 teaspoon pepper on top.  Toss with 3 tablespoon olive oil and spread evenly on the sheet.  Place in the lower third of the oven and cook for 10 minutes.

2.  Meanwhile, place the butternut squash on another baking sheet.  Drizzle with remaining 2 tablespoons olive oil and sprinkle with 1/2 teaspoon salt and 1/4 teaspoon pepper; toss and spread evenly in the pan.  Once the peppers and onions have cooked for 10 minutes, add the squash to the upper third of the oven and roast, along with the peppers and onions, until fork-tender, 15 minutes.  Let the vegetables cool completely on their pans.

Freeze it!  Divide into 1-cup portions, keeping the peppers-onion mixture and the squash separate.  Transfer to resealable plastic sandwich bags.  Squeeze out the air and flatten the bags.  Seal and store flat in 2-gallon freezer bags.

Building Block #4:  Pulled Chicken
Makes about 12 cups
Prep-  15 minutes   Roast- 50 minutes

4 lbs. skin-on, bone-in chicken breasts
4 lbs. skin-on, bone-in chicken thighs
2 tablespoon olive oil
2 lemons, cut into wedges
1 teaspoon paprika
1 teaspoon dried thyme
Salt and pepper

1. Position racks in the upper and lower thirds of the oven and preheat the oven to 400 degrees.  Line 2 large rimmed baking sheets with parchment.  Place the chicken breasts on 1 sheet and the thighs on another.  Drizzle with the olive oil and squeeze the lemons on top (put squeezed lemons on sheet with chicken).  Sprinkle with the paprika and thyme and season with salt and pepper.  Roast until the skin is crisp and the juices run clear when the pieces are pierced with the tip of a sharp knife, 45 to 50 minutes.  Let cool for 15 minutes.

2. Remove the chicken skin, then pull and cut the meat off of the bones.  Tear the meat into shreds.  (Save the bones, skin and juices to make a broth, if you want to.  My Rosemary Chicken recipe talks about how to make broth).

Freeze it!  Divide into 1 1/2 cup portions and transfer to resealable plastic sandwich bags.  Squeeze out the air and flatten the bags.  Seal and store flat in 2-gallon freezer bags.

Building Block #5Rice Pilaf
Makes 15 cups
Prep- 20 minutes  Cook- 50 minutes


3 tablespoon olive oil
3 onions, cut int 1/2-inch pieces (about 4 1/2 cups)
3 1/4 cups long-grain rice
2 1/4 cups chicken or vegetable stock
4 bay leaves
16 ounce frozen peas

1.  In a 7- qt. pot, heat the olive oil over medium-high heat.  Add the onions, 1/2 teaspoon salt and 1/4 teaspoon pepper and cook, stirring often, until golden and translucent, about 8 to 10 minutes.

2.  Add the rice and cook, stirring for 1 minute.  Add 2 1/4 cups water, the broth, bay leaves, 2 teaspoon salt and 1 teaspoon pepper and bring to a boil.  Stir, cover, lower the heat and simmer, undisturbed (really, don't peek!  You get sticky rice that way), until the liquid is absorbed and the rice is tender, about 20 to 25 minutes.  Remove from the heat and fluff with a fork.  Quickly scatter the peas on top, cover and let stand for 5 minutes. Uncover and let cool completely, tossing once or twice.  Discard the bay leaves.

Freeze it!-  Divide into 1-cup portions and transfer to resealable plastic sandwich bag.  Squeeze out the air and flatten the bags.  Seal and store flat in 2-gallon bags.


Timeline for Prep Day

Pork- Preheat the oven and get the meat going.

Tomato Sauce- While the pork is in the oven, start the sauce so it can simmer at the same time.

Veggies-   Next up, vegetable prep.  Arrange the cut veggies on the baking sheets and as soon as the pork is out of the oven, increase the oven temp and pop them in.

Chicken-  Have all the ingredients ready.  If you need the baking sheets the vegetables are on, scrap the veggies onto a platter or cutting board to cool.  Simply line the sheets with parchment and get roasting.

Rice-  While the chicken cooks, make the pilaf.

And now you're all ready to make a whole month's worth of dinners!  Phew!  Reward yourself with a bowl of ice cream and the left over wine. 

Stay tuned for the first recipe of the menu-  Spanish Rice with Shrimp, using Building Blocks #2, 3 and 5.

Monday, August 8, 2011

Broiled Salmon with Citrus Glaze


Sometimes with cooking, as with life, less is more.  This recipe is so basic, yet so flavorful you could serve it up to company.  Just make sure you have extra since it will go fast.  Abe loved every single bite and kept saying "Mmmmm.... this is good!" the whole time.

I served it with mashed potatoes and steamed asparagus.

I got the recipe from Foodnetwork.com.

Broiled Salmon with Citrus Glaze
Serves 4

1 side, skin-on salmon, 1 1/2 to 2 pounds, pin bones removed
1/3 cup dark brown sugar
2 tablespoons lemon zest
1 1/2 teaspoons kosher salt
1/2 teaspoon freshly ground black pepper

Position a rack in the oven 3 inches from the broiler. Line a cookie sheet with aluminum foil and place the salmon on the pan.


Place the sugar, zest, salt, and pepper into a food processor and process for 1 minute or until well combined. Evenly spread the mixture onto the salmon and allow to sit for 45 minutes, at room temperature.


Turn the oven on to the high broiler setting for 2 minutes. After 2 minutes, place the salmon into the oven and broil for 6 to 8 minutes or until the thickest part of the fish reaches an internal temperature of 131 degrees F on an instant-read thermometer. Remove the salmon from the oven and allow to rest, uncovered, for 8 to 10 minutes. Serve immediately.

Thursday, July 21, 2011

White Bean, Artichoke and Chard Ragout with Fennel Relish


I know this dish might sound complicated, but when you realize that the crock pot does most of the cooking for you, it suddenly doesn't seem daunting at all.

I was a little worried that Abe wouldn't like this at all.  I mean, it's got fennel in it.  Not the go-to veggie for a lot of people.  But I had ordered a box of organic fruits and vegetables delivered to my house from Groupon.com and needed to use the fennel I found inside.  I pretty much hate anything licorice tasting, but for some reason, like it when it's in a savory dish.  So, off I went to find a suitable recipe. 

And surprise!  Abe really enjoyed it.  I think he actually enjoyed it a bit more than I did!   See, things can still surprise you in a marriage even after several years.  Abe did comment that he did like it with a lot more lemon juice than the recipe called for, so I added that, and a few other modifications, to the recipe.  I'm going to write it where you add additional lemon juice to the final product, to taste.  Some of you might not be as big of sour pusses like we are!

Just in case you are wondering what the heck a ragout is (and I did too, so don't worry), it's a French term for main course stew.  There you go, just a fancy term for stew.  Impress your friends next time at dinner when you tell them you're making them a ragout (pronounced ragu).

Don't be tempted to skip the fennel relish.  It makes the dish.  Even Abe, who I suspect doesn't like fennel, said so.  He told me to make double the amount next time.  Look who likes fennel after all!

Oh, and I took the picture before I remembered to add the chard.  Oops!  So, yours will look a little bit different.

Base recipe was found at CookingLight.com.

White Bean, Artichoke and Chard Ragout with Fennel Relish
Serves 6

Ragout:

1 tablespoon olive oil
3 cups thinly sliced leek (about 2 large)
1 cup (1/2-inch-thick) slices carrot
3 garlic cloves, minced
3 cups cooked cannellini or Great Northern beans
2 1/2 cups chopped fennel bulb (about 1 large)
2 cups (1/2-inch) cubed red potatoes
1 cup chopped red bell pepper
3/4 cup water
1 teaspoon dried basil
1 1/2 teaspoon salt
1/4 teaspoon dried oregano
1/4 teaspoon black pepper
1/4 teaspoon cayenne pepper
1 (14.5-ounce) can diced tomatoes with basil, garlic, and oregano, drained
1 teaspoon tomato paste
1 (14-ounce) can vegetable broth
1 (9-ounce) package frozen artichoke hearts, thawed
2 cups chopped Swiss chard

Relish:

1 cup boiling water
6 sun-dried tomatoes, packed without oil (or homemade, recipe below)
3 cups shredded fennel bulb (about 1 large)
1 cup diced yellow bell pepper
1/4 cup chopped fresh parsley
2 tablespoon fresh lemon juice
2 teaspoons olive oil
1/2 teaspoon sugar
1/2 teaspoon salt
1/4 teaspoon black pepper

Lemon wedges for serving 

To prepare ragout, heat 1 tablespoon oil in a large nonstick skillet over medium heat. Add leek, carrot, and garlic; cover and cook 5 minutes or until tender.

Place leek mixture in a 5-quart electric slow cooker. Add beans and next 13 ingredients (through artichokes). Cover and cook on high 8 low (or 4 hours high) or until vegetables are tender. Add chard; stir until chard wilts.

To prepare relish, combine boiling water and sun-dried tomatoes; let stand 15 minutes or until soft. Drain; chop. Combine sun-dried tomatoes and remaining ingredients; let stand 30 minutes.


Ladle ragout into a shallow bowl, add relish on top and squeeze lemon wedge to taste.

Tuesday, July 19, 2011

Roasted Vegetable Couscous with Chickpeas and Onion-Pinenut Topping (Al Cuscus bil Khodar al-mausim)

Picture courtesy of Cooking Light

Trying to cut down on the amount of meat I had to buy this week, I decided we were going to have 2, count them, 2 meatless nights.  Good news for me since I will actually get to eat dinner.  Thankfully, my darling husband never complains about eating veggie.  This one is so hardy that I don't think he will be sneaking off for a bowl of cereal an hour after dinner like he does on most vegetarian nights.

 I know it seems like a lot of steps and ingredients, but it comes together quickly.  While the veggies are roasting, you can get the couscous and topping ready, so once the timer goes off, bam! There's dinner.  It's nice enough for serving to company, but easy enough to make for a casual night at home.

The original recipe called for sweet potatoes, but we aren't a sweet potato kind of family, so I replaced it with butternut squash.  Feel free to do one or the other (or both!).


The spice mix adds a wonderful ethnic flavor and warmth.  It is a great one to have on hand for those times you want a little spice for veggies or rice.  It will keep for 1 month in an airtight container.  I double the spice in the couscous recipe, so if you're one to worry about spice, add 1/2 of it and sprinkle some on the dish later if you feel it needs it.  I think most will enjoy the amount I used.


I got this recipe from CookingLight.com.


Roasted Vegetable Couscous with Chickpeas and Onion-Pinenut Topping


5 cups diced peeled butternut squash or sweet potatoes (about 1 1/2 pounds) 
2 cups (1/2-inch) diced peeled parsnips (about 10 ounces)
1 1/2 tablespoons extra-virgin olive oil
2 teaspoon Ras el Hanout (recipe to follow)
3 carrots, peeled and cut crosswise into 2-inch pieces (about 9 ounces)
1 teaspoon kosher salt, divided
1 1/4 cups vegetable broth
1 cup uncooked couscous
1 (15-ounce) can chickpeas (garbanzo beans), rinsed and drained

Topping:
1 tablespoon olive oil
1 yellow onion, cut into 1/4-inch-thick slices, separated into rings
1/4 cup pine nuts
1/4 cup raisins
1 teaspoon ground cinnamon
1 tablespoon honey

1. Preheat oven to 450°.

2. To prepare couscous, combine the first 5 ingredients in a large bowl; stir in 1/2 teaspoon salt. Place potato mixture on a baking sheet. Bake at 450° for 30 minutes or until the vegetables are tender, stirring occasionally.

3. Bring broth to a boil in a medium saucepan. Stir in couscous and remaining 1/2 teaspoon salt. Remove from heat; cover and let stand 10 minutes. Fluff with a fork; gently stir in chickpeas. Keep warm.

4. To prepare topping, heat 1 tablespoon oil in a medium skillet over medium heat. Add onion to pan; cook 12 minutes or until tender and golden brown, stirring occasionally. Add pine nuts and raisins; cook 2 minutes. Stir in cinnamon; cook 30 seconds. Stir in honey, and remove from heat.

5. Mound couscous in the middle of a serving platter. Place the roasted vegetables around base of couscous. Arrange 5 carrots vertically around couscous; spoon topping over top of couscous.

Ras el Hanout

2 1/2 teaspoons kosher salt
2 teaspoons ground cumin
2 teaspoons ground ginger
2 teaspoons freshly ground black pepper
1 1/2 teaspoons ground cinnamon
1 teaspoon ground coriander
1 teaspoon ground red pepper
1 teaspoon ground allspice
1 teaspoon saffron threads, crushed (if you cannot find saffron or don't want to buy, omit)
1/2 teaspoon ground cloves
1/4 teaspoon freshly ground nutmeg
1. Combine all ingredients in a small bowl.

Monday, July 18, 2011

Buttermilk-Brined Pork Chops


I decided to try to get back into menu planning again.  Lately too many dinners were decided about 20 minutes before Abe came home and consisted of Boca burgers or Abe making himself tuna salad.  So, out came the flyer for what's on sale this week at the grocery store and my trusty list of cooking books and websites.  Ah.  Add a cup of coffee and this girl's in heaven.

This recipe is very simple and tasty.   You will need to brine it overnight, so plan that into your schedule.  They come out moist and delicious!

I served it with a baked potato and sauteed veggies.

I got this recipe from CookingLight.com. 

Buttermilk-Brined Pork Chops
Serves 4

2 cups buttermilk
2 tablespoons kosher salt
2 tablespoons sugar
1 tablespoon grated lemon rind
1 teaspoon chopped fresh rosemary (or about 1/3 teaspoon dried)
1 teaspoon chopped fresh sage (or about 1/3 teaspoon dried)
4 (6-ounce) bone-in center-cut pork chops (about 1/2 inch thick)
2 teaspoons freshly ground black pepper
Combine first 6 ingredients in a large zip-top plastic bag; shake well to dissolve salt and sugar. Add pork; seal and refrigerate overnight, turning bag occasionally. Remove pork from bag; discard brine. Pat pork dry with a paper towel. Sprinkle pork with pepper.
Heat a large nonstick grill pan over medium-high heat. Coat the pan with cooking spray. Add pork; cook 3 1/2 minutes on each side or until desired degree of doneness.

Saturday, July 2, 2011

Southwestern Potato Salad

I was requested to make a potato salad for some family dinner... can't remember the occasion.  I have a standard version that I've made before.  But I was a bit tired of making it and wanted to find something a bit different.  This fit the bill and became a big hit. 

This recipe has a bit of a kick, so if you like spicy, you are in heaven.  If you're not into the spice so much, adjust the chipotle puree and cayenne to so that it has just a hit of warmth (I'd suggest starting with 1 tablespoon and go from there).  But if you can stand the heat, make it full-strength.  Have a glass of milk nearby though.  The chipotle puree keeps well in the fridge and makes a great condiment to add to lots of things, like sandwiches or anything that calls for a bit of heat.

This goes so perfectly with summertime grilling and picnics.  It stays nice and creamy, so it can stand up to being out in the heat.  I prefer serving it warm or room temp, as I think it loses a bit of its flavor when it's cold.

I got this recipe from Foodnetwork.com.

Southwestern Potato Salad
Serves 8

1 1/2 cups mayonnaise
1/4 cup Dijon mustard
2 tablespoons fresh lime juice
2 tablespoons chipotle pepper puree (recipe below)
1 large ripe tomato, seeded and diced
1/4 cup chopped cilantro leaves
3 scallions, chopped, white and green parts
1 medium red onion, thinly sliced
1/2 teaspoon cayenne
4 cloves garlic, finely chopped
Salt and freshly ground black pepper
16 new potatoes, about 3 to 4 pounds, cooked, drained and sliced 1/2-inch thick

Combine all the ingredients, except the potatoes, in a medium bowl and season with salt and pepper, to taste. Place warm potatoes in a large bowl and pour the mixture over potatoes and mix well. Season again with salt and pepper, to taste.

Chipotle Puree

1 can chipotle in adobo sauce

Puree in blender or food processor with a bit of olive oil until smooth.  Can be stored in an airtight container for several weeks.

Thursday, June 30, 2011

Slow-Roasted Tomato Soup

Photo courtesy of Google Images

I was with the kids at the library and asked Adam if he'd indulge me in coming out of the children's section while I got myself a "Mommy book".  Now, back in the day (aka before kids), a "me book" would've been anything from a cheesy pink book (a book for younger ladies) to a documentary on the fall of societies.  Lately, though, my time and brain power for reading has faltered, so the closest I find myself to reading lately is either snippets on the internet or cookbooks.  So, my eyes lit up a little bit when I saw a copy of Gwyneth Paltrow's new cookbook, My Father's Daughter, on the shelf.   There;'s something about Gwyneth that says "pretty girl who you could be friends with" to me.  Of course, I've never met her and she could be a flaming banshee who shrieks for her butler to fetch her some distilled French water for all I know.  But I still like my fantasy.

I decided to try her tomato soup, mainly because her white bean soup recipe didn't appeal to Abe and he casually mentioned that the tomato one looked good.  This is how dinner is decided a lot in my house.  The soup is delicious and very easy to make.  It's perfect for summer with all of the ripe tomatoes at the farmers' market.  It can also see dining on this in the dead of winter.

The roasted tomatoes part added a lot of nice flavor and texture to the soup, so don't skip it.   They can be made ahead and stored in a Tupperware container with a bit of olive oil to keep from drying out.  They were so yummy and can be added to things like salad and sandwiches too.  They keep in the fridge for about a week, but I doubt they'll last that long.

I served it with green salad and a crusty baguette that I sliced, topped with a bit of olive oil and shredded cheddar cheese and popped into the oven until the cheese was melted.  It was quite the delightful meal.

Slow-Roasted Tomato Soup
Serves 4

3 tablespoons extra virgin olive oil
2 large cloves garlic, peeled and thinly sliced
4 fresh large basil leaves
2 14-ounce cans whole peeled tomatoes with their juice
16 pieces (8 whole) slow-roasted tomatoes (recipe below), roughly chopped
1 large pinch of sugar
Coarse salt
Freshly ground black pepper
1/4 cup fresh basil leaves

Heat the olive oil in a large heavy pot over medium heat.  Add the garlic and cook, stirring, for 2 minutes.  Add the basil leaves, tomatoes and their juice, and 1 can's worth of water (making sure to swish to get the rest of the tomato juices).  Bring to a boil, turn the heat to low and simmer for 40 minutes.  Stir in the slow-roasted tomatoes and season to taste with sugar, salt and pepper (about 1/2 teaspoon salt and 1/4 teaspoon pepper).  Tear 1/4 cup basil leaves and stir in.  Drizzle a bit of olive oil over top of each portion.


Slow-Roasted Tomatoes

Vine-ripened tomatoes
Olive oil
Salt

Preheat oven to 275 degrees.

Cut the tomatoes in half horizontally, rub with a tiny bit of olive oil and a pinch of salt and bake seed side up in a 275 degree oven for 3-5 hours, or until they look nearly sun-dried (the edges will be caramelized and the moisture will be almost entirely evaporated).

Thursday, June 9, 2011

Chicken and Dumplings

Photo courtesy of Google Images


Holy heck.  How did so many months pass by without a blog update?  I blame it on work, a vegetarian Lent season and lots and lots of Jimi's baseball games, where Abe is the coach and therefore doesn't come home until well after dinnertime.  I do apologize (well, to the 2 of you who missed me.  Muah!  I love ya).
I got a request from a lady on the parenting message board that I practically live on.  She wanted a homemade and easy chicken and dumpling recipe to replace the store bought she had been using.  I've never made one and was pretty sure that Abe and Jimi hadn't eaten it, so what an adventure for all of us.  So, I went to my mainstay, Food Network (Rachel Ray) and found one that Abe deemed so worthy of company.  Jimi LOVED it.  I mean, loooooved it.  I think he might have licked the plate before putting it in the sink that night.

It's got a cheat- store bought biscuit dough.  I know, real foodies would scoff at using a boxed biscuit mix.  So, for those of you with tons of time on your hands, go knock yourself out your favorite biscuit dough recipe.  The rest of us will do fine with with Jiffy Mix.  It's not like real foodies are reading this blog anyway.

I plan on busting this out for my mom's 80th birthday dinner with the family.  

Chicken and Dumplings

1 1/2 pounds chicken breast tenders
1 tablespoon olive oil
2 tablespoons butter
1 russet potato, peeled and diced
2 medium carrots, peeled and diced or thinly sliced
1 medium onion, chopped
1 rib celery, diced
1 bay leaf, fresh or dried
Salt and freshly ground black pepper
1 teaspoon poultry seasoning
2 tablespoons flour, a handful
1 quart chicken broth or stock
1 small box biscuit mix
1/2 cup warm water
Handful flat-leaf parsley, chopped
1 cup frozen green peas


Dice tenders into bite size pieces and set aside.

Place a large pot on stove over medium high heat. Add oil, butter, vegetables and bay leaf and cook 5 minutes, stirring frequently. Season mixture with salt, pepper and poultry seasoning. Add flour to the pan and cook 2 minutes. Stir broth or stock to the pot and bring to a boil. Add chicken to the broth and stir.

Place biscuit mix in a bowl. Combine with 1/2 cup warm water and parsley. Drop tablespoonfuls of prepared mix into the pot, spacing dumplings evenly. Cover pot tightly and reduce heat to medium low. Steam dumplings 8 to 10 minutes. Remove cover and stir chicken and dumplings to thicken sauce a bit. Stir peas into the pan, remove chicken and dumplings from heat and serve in shallow bowls.