Showing posts with label Simple to make. Show all posts

Monday, March 11, 2013

Yummy Black Bean Soup

Image via Google

I love a good black bean soup.  Warm, hearty, tasty and I don't feel guilty if I go back for a second bowl (and then another one in the evening). 

Abe's been watching his waistline again, so after indulging in some less-than-healthy food the day before, he requested a healthy dinner the next morning.  And I happily agreed.  Until it was about 30 minutes before he was to come home and I had forgotten about dinner.  Oops.

A bit panicked, I remembered I had a bunch of black beans in the freezer.  So, black bean soup it was.  I looked around for a recipe that would be a bit different than the sometimes bland ones I've made in the past.  I hit the jackpot with this one! I think it's the best black bean soup I've made in a while.

So easy and so yummy.  The celery seed and cumin add a bit of a twist and you can spice it up or keep is on the mild side for the kids by reducing the pepper flakes, like I did.  A bottle of hot sauce at the table will let the braver ones add more heat.

Full of fiber and protein, this will stick to your ribs during a cold night.  It freezes well, too, so double up and you'll have dinner waiting for you the next time you're like me and forget to cook. 

I served with a leafy green salad.

Recipe from Melissa D'Arabian.

Yummy Black Bean Soup 
Serves 4-6

2 celery stalks, chopped
1 carrot, chopped
1 onion, chopped
3 tablespoons olive oil
2 teaspoons dried oregano
1 teaspoon ground cumin
1/2 teaspoon red pepper flakes
1/2 teaspoon celery seeds
3 cloves garlic, minced
2 cups cooked black beans
1 tablespoon vegetarian (or chicken bouillon base)
1 bay leaf
One 14-ounce can diced tomatoes
Kosher salt and freshly ground black pepper
 
Cook the celery, carrots and onions in the olive oil in a large saucepan over medium heat until soft, about 5 minutes. Add the oregano, cumin, red pepper flakes, celery seeds and garlic and cook until fragrant. Add the black beans, bouillon, bay leaf and tomatoes, and enough water to cover by an inch or two (about 3 cups). Simmer for at least 30 minutes, up to 2 hours, adding water if needed. Season and serve.


Saturday, December 1, 2012

The Best Meatloaf

Courtesy of myrecipes.com


I'll admit.... I'm not really a fan of meatloaf.  I mean, before becoming a veg-head, I'd eat it when my mom made it. I always covered in tons of ketchup to make it palatable and only ate it because the wrath of my mom wasn't worth risking.

As a wife and mom myself, I never really consider making it.  I tried it once a while ago and it was a disaster.  So, when I was, yet again, panicking at 3:00 about what to make for dinner, I surprised the heck out of myself by thinking "Hey, frozen ground beef.... MEATLOAF!"  Abe even had a pause of surprise in his voice when he called to ask what was for dinner.

I found a recipe that had a lot of great reviews and seemed to have a lot of flavor to it and wished for the best.

It was a huge hit!!  Abe's exact words were "Wow, this is.... great!"  Jimi gave me a thumbs up while munching away and went back for a second serving.  Adam told me it was yummy.  Ava played with her food, like usual, and then begged for a yogurt once the dishes were done.  That's another story for another setting....

I messed up slightly with the seasoning, so I'm going to write the recipe the way I made it.  Base recipe is from myrecipes.com.

The recipe calls for patting out a free-form loaf instead of using a loaf pan.  My limited experience with meatloaf seems to agree. I just put it on plastic to keep the bits together and smushed out the shape best I could (throwing away the plastic, of course).  I resisted the urge to add more binders, as I knew that would make the loaf more dense. 

Oh and don't be like me and forget that you need to defrost the meat before making the meatloaf.  I rarely make anything with ground beef and it's always tacos which can be defrosted as you cook.  Oops.  Thankfully the microwave did a good job of defrosting on the spot.

The Best Meatloaf

1 tablespoon butter
3 celery ribs, finely chopped 
1/2 large onion, finely chopped 
2 pounds lean ground beef 
3 tablespoons Worcestershire sauce, divided
1/2 cup Italian-seasoned breadcrumbs (or any kind of breadcrumbs with some Italian herbs added)
1/3 cup ketchup 
2 teaspoons Creole seasoning (I used Cajun as that's all I had)
1 teaspoon Greek seasoning
1 teaspoon garlic powder
2 large eggs, lightly beaten 
1 (8-ounce) can tomato sauce (I used spaghetti sauce)
3 tablespoons tomato paste
1 tablespoon ketchup 


Melt butter in a medium nonstick skillet over medium heat; add celery and onion, and sauté 7 minutes or just until tender.

Stir together celery mixture, ground beef, 2 tablespoon Worcestershire sauce, breadcrumbs, and next 5 ingredients in a large bowl. Shape into a 10- x 5-inch loaf; place on a lightly greased broiler rack.

Place rack in an aluminum foil-lined broiler pan.

Bake at 350° for 45 minutes. Stir together remaining 1 tablespoon Worcestershire sauce, tomato sauce, tomato paste, and 1 tablespoon ketchup until blended; pour evenly over meatloaf, and bake 10 to 15 more minutes or until no longer pink in center. Let stand 10 minutes before serving.

Friday, November 2, 2012

Asian-Glazed Chicken Thighs


What was just a throw-together "Oh my god, dinner is coming up and I have no recipe!" moment turned into what Abe titled as One Of My Best Chicken Recipes, Ever.     Top 3, he said.  Sweet and slightly spicy and yum.

Hey, I'll let him think I carefully perused the recipes to find just the perfect one for him.  Sometimes, the best results come from accidents.

He had to stop himself from eating all 8 chicken thighs.  I had to pack them away for lunch, actually..lol.

I had to modify the recipe for what I had at home, so I'm going to post that recipe since it was the winner.

Base recipe found on www.allrecipes.com.

Asian-Glazed Chicken Thighs
Serves 4


1/2 cup rice wine vinegar
5 tablespoons brown sugar
1/3 cup soy sauce
1/4 cup sesame oil
3 tablespoons Asian chili garlic sauce
3 tablespoons minced garlic
Salt to taste
8 skinless chicken thighs


Whisk the vinegar, brown sugar, soy sauce, sesame oil, chili garlic sauce, garlic, and salt in a bowl until smooth. Pour half the marinade into a large plastic zipper bag; retain the other half of the sauce. Place the chicken thighs into the bag containing marinade, squeeze all the air out of the bag, and seal. Shake a few times to coat chicken; refrigerate for 1 hour, turning bag once or twice.

Preheat oven to 425 degrees F (220 degrees C).

Pour the other half of the marinade into a saucepan over medium heat, bring to a boil, and cook for 3 to 5 minutes, stirring often, to thicken sauce. Remove the chicken from the bag; discard used marinade. Place chicken thighs into a 9x13-inch baking dish, and brush with 1/3 of the thickened marinade from the saucepan.

Bake 40 minutes, basting one more time after 10 minutes; an instant-read thermometer inserted into a chicken thigh should read 165 degrees F (75 degrees C).


Wednesday, October 10, 2012

Crock Pot Beef Dip Sandwich

Courtesy of Google Images

Abe went to Boston to visit a life-long friend.  We was gone for 5 days, so long enough for me to really miss him (you know the first few days are known as Oh Good, I Can Watch Real Housewives Without Ridicule Days).  So, I wanted him to come home to a special treat.

This recipe is crazy easy.  Like, I was a bit embarrassed at how much praise I got because all I did, really, was dump some stuff in a crock pot and walk away.  But, hey, I'll take it.

Can also be made in a covered dutch oven in the oven at 275 degrees for 5-6 hours.

I adapted this recipe from The Pioneer Woman. 

Crock Pot Beef Dip Sandwich


1 whole beef chuck roast, 2.5 To 4 pounds
1 can beef consomme Or beef broth
3 Tablespoons Italian seasoning (I used a packet of Italian salad dressing)
1 teaspoon salt (don't add if you are using salad dressing)
1 teaspoon minced garlic
1/4 cup water
1/2 jar (16 Oz) pepperoncini peppers, with juice
 
Buttered, toasted deli rolls
Cheese of your choice 

Combine all ingredients in  crock pot.  Cook on high for 5-6 hours or low for 9-10 hours or until fork tender.

Remove from crock pot. With two forks, completely shred all meat, leaving no large chunks behind.

Serve on buttered, toasted rolls with some of the peppers, if desired. Top with cheese and melt under the broiler if desired. Serve with juices from the pot.


Friday, October 5, 2012

Pumpkin Spice Latte


Autumn.  My favorite season.  The days get cooler.  The trees change colors.  Halloween.  Tank tops and flip-flops are packed away, replaced by sweaters and boots. 

For many, me included, Starbucks' pumpkin spice latte is tasty and addictive tradition of the season.  Only here for a while, millions flock to get their fix. 

As yummy as it is, the cost starts to add up at $3.50+ a pop.  Not to mention, sometimes I just want one and I'm just to dang lazy to leave the house.

So, I decided to look up how to make one at home.  And, wow, it's a damn good and freakishly easy.

And it's all natural, no weird syrups and you can control the sugar content and what level of spice you want. 

Store extra pumpkin puree in the refrigerator for your next pumpkin spice latte fix or even yummy pumpkin pancakes or muffins. 

Brew coffee with double of grounds that you normally do.  For an extra kick, add a teaspoon of instant espresso.   And, of course, if you have an espresso machine, use the real stuff in place of the coffee.

Full milk makes it nice and creamy, but it's just as delicious with reduced fat milk. 

Pumpkin spice can be made at home, by the way.  Equal portions of cinnamon, nutmeg, allspice and ground ginger can be stored in an old spice jar.

Recipe adapted from recipegirl.com.

Pumpkin Spice Latte
Makes 1 drink

1/2 cup whole milk
2 tablespoon unsweetened canned pumpkin puree
1 teaspoon packed light brown sugar
1/4 teaspoon pumpkin pie spice (add a bit more if you like it spicier)
1 teaspoon vanilla extract
1 cup hot brewed, strong coffee
2 tablespoons half & half cream
1 teaspoon granulated white sugar, or more to taste
whipped cream, optional
ground nutmeg


1. In a glass measuring cup or microwave-safe bowl, whisk together milk, pumpkin, brown sugar, spice and vanilla. Microwave for 1 to 2 minutes until it's hot and frothy.

2. Pour the pumpkin milk into a tall mug or glass. Add hot coffee. Pour in the cream. Add a teaspoon of sugar. Stir, and taste. Add more sugar, if desired.

3.Add optional whipped cream and nutmeg and enjoy hot!

Related items:

Friday, August 24, 2012

Cheesecake Filled Strawberries

Via Google Images

I needed a yummy treat to bring to a friend's brunch.  The thought of combining yummy cheesecake with fresh strawberries seemed like the perfect bite. 

It's crazy how easy these are to make.   You could even mix up a little of the cheesecake and keep it stored in the fridge to serve yourself up a tasty anytime snack.  Serve along side of french toast or waffles for an extra special breakfast. Drizzle with chocolate syrup or dolloped with whipped cream. So many ways to enjoy! 

Recipe from budgetsavydiva.com.


Cheesecake Filled Strawberries
 
10 strawberries
1/4 teaspoon vanilla extract
1/4 cup powdered sugar
4 oz. softened cream cheese or neufchatel cheese (low fat cream cheese works well)

Wash and dry strawberries.  Using a small knife, make an "x" cut 3/4 of way down strawberry.  Make sure not to cut all the way through.

Mix remaining ingredients in bowl.  Pipe into strawberries using a pastry bag or a plastic bag with the tip cut off.


Related items:


Thursday, August 16, 2012

Easy Homemade Applesauce

Image via Google Images


I can hear some of you now..... why on earth would anyone want to make something that you can easily buy in a jar?  My friend Michelle, in fact, teased me about just that.

There are a lot of reasons, including knowing what goes into the apple sauce, being able to control the amount of sugar and my favorite, awesome taste!  Homemade applesauce blows the jarred stuff out of the water.  And it's crazy easy to make, especially if you have the right tools.  It's a fun cooking activity for your little ones, too.

One tool that makes any apple dish easier is the apple corer.

 It's a simple and cheap tool that especially punches out the core.


Another tool is the apple slicer, which not only cores, but slices.


This works best if you peel first (I've made the mistake of not doing that and then having to peel each slice.  Not fun.


Now, if you want to get super fancy, you'd get yourself an apple peeler.  You could whip through a bag of apples in no time.   Some even core at the same time.


 I just use a good old fashioned paring knife and the peeling is done in no time.

The recipe is a base recipe and can be easily adjusted to taste.  Some like a very sweet applesauce, where others like a more tart one.  Spices are up to your taste, too.  The base recipe calls for cinnamon, but nutmeg and/or apple pie spice mix can easily be used.

The choice of apples is also yours.  Typically, you want a softer, sweeter apple, like  Red Delicious, Gala, Fuji, Winesap, McIntosh or Yellow Delicious.  I like a tarter choice too, like Granny Smith.  It's good to mix types if you can.  This holds the same for apple pies and crisps.   Pick organic apples, when you can, to keep pesticides and other not-so-good things from your tasty creation. 

Use up your applesauce in about 2 weeks.  Mine never ever lasts that long though.  It can be frozen too.

Homemade Applesauce


12 apples, such as Granny Smith or McIntosh
1 1/2 cup water
3/4 cup sugar (or to taste)
1/2 teaspoon cinnamon or apple pie spic mix (or to taste)
Peel and slice the apples into small pieces. Put apples in a pot

Add water to pot and bring to a low boil over medium heat, mashing apples as they cook down. Keep the pot covered.

When desired consistency, add sugar and cinnamon. Bring to a boil and then recover and remove from heat. Let cool in the pot and then refrigerate.


Base recipe from Pinch of Yum.

All images via Google Images.


Friday, June 15, 2012

Asian Grilled Salmon


No witty story behind this one.  I had salmon and needed to use it up before it followed in the footsteps of a few of my in-the-freezer-so-long-you-can't-pass-it-off-as-good proteins lately.  Once I first got a deep freeze, I sort of lost track of expiration dates and had a few "Um, what's with the chicken?" meals.  So, I wanted to make sure that didn't happen again. 
 

The recipe is super simple and delicious.  I used a grill pan instead of grilling it outdoors, but I'm sure it would be just as good in a skillet, too.

My salmon didn't have a skin, which didn't present with a problem on the grill pan.  I also didn't let it rest, like the recipe suggests (I didn't even see that part until writing this blog entry), so if you want it hot, go right ahead and serve that sucker up.

Asian Grilled Salmon
Serves 6

1 side fresh salmon, boned but skin on (about 3 pounds)
2 tablespoons Dijon mustard
3 tablespoons soy sauce
6 tablespoons olive oil
1/2 teaspoon minced garlic


 Oil the grill or spray the grill pan with cooking spray and then heat the grill/grill pan (or skillet) on medium-high.

While the grill is heating, lay the salmon skin side down on a cutting board and cut it crosswise into 4 equal pieces. Whisk together the mustard, soy sauce, olive oil, and garlic in a small bowl. Drizzle half of the marinade onto the salmon and allow it to sit for 10 minutes.

Place the salmon skin side down on the hot grill; discard the marinade the fish was sitting in. Grill for 4 to 5 minutes, depending on the thickness of the fish. Turn carefully with a wide spatula and grill for another 4 to 5 minutes. The salmon will be slightly raw in the center, but don't worry; it will keep cooking as it sits.

Transfer the fish to a flat plate, skin side down, and spoon the reserved marinade on top. Allow the fish to rest for 10 minutes. Remove the skin and serve warm, at room temperature, or chilled.


Wednesday, March 28, 2012

1-Minute Frozen Yogurt


Photo courtesy of Jamie Oliver

You know those nights when you're craving something sweet and cold late at night, but just can't justify getting into your car for a DQ run? Not to mention the calories-guilt when you're done binging?

Don't ask me how I know about this.....

Well, here is a quick and healthy way to keep the ice cream cravings at bay.

All you need are a blender, frozen berries, yogurt (I used plain Greek) and some honey.  How simple is that?

I got this from Pinterest and Jamie Oliver.

If you have a blender like mine (read: crappy), you will need to stop a few times to mix it together.  I swear to myself every time I make something in the blender that I will invest in a new one.

Add honey/maple syrup to taste.  Use the minimum if you like a tarter yogurt and more if you like it sweeter.  You know, rocket science and all.  You can make without the mint, but it really adds a nice flavor and freshness.

1-Minute Frozen Yogurt
Serves 2

1 cup yogurt (I used plain Greek, but use any that you have)
2 cups frozen berries
1 cup fresh berries (I used blueberries)
2-3 tablespoon honey or real maple syrup
1/4 teaspoon vanilla
A few Mint sprigs

Add 2 serving glasses to the freezer.

When glasses are nice and cold, add yogurt, mint and honey (or maple syrup) to blender.  Blend.  Add frozen berries and blend until combined.

Add fresh berries to the bottom of each glass and top with frozen yogurt and serve.


Related Products:


Monday, March 26, 2012

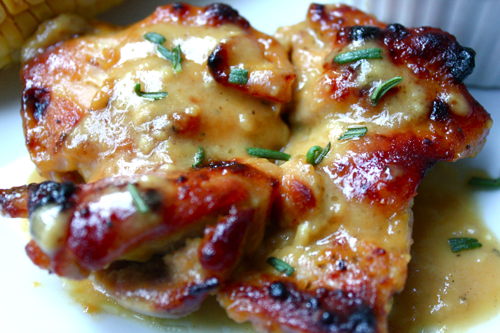
Man-Pleasing Chicken

Courtesy of Witty in the City

Much like with Angry Chicken, I was compelled to make this dish solely on the name.  I mean, come on... I've got a man.... I'm trying to please him..... it appeared to be a no-brainer.  It didn't hurt that I was low on supplies and it had only 4 ingredients, all ones that I had.

Scary simple, just mix 3 ingredients together, pour over the chicken and bake.

Abe's reaction?  "Um, this chicken IS man-pleasing!"   And then proceeded to eat the extra I had made for the following day's lunch.

That's Man for Yummy.

I used bone-in thighs, but you can easily adjust to use boneless or breasts.  Just make sure to adjust your time down.  Use a meat-thermometer to check your temps.

I got this recipe from a blog called Witty in the City.

Man-Pleasing Chicken
Serves 3

1 1/2 pounds of bone-in chicken thighs
1/2 cup  dijon mustard
1/4 cup maple syrup (the real stuff)
1 tablespoon rice wine vinegar (or cider vinegar)

Preheat oven to 450. Place chicken in a baking dish.  Combine the mustard, maple syrup and vinegar in a bowl and pour over chicken, flipping chicken to coat.

Bake, uncovered, for 40 minutes or until meat thermometer reads 180 degrees.

Let rest for 5 minutes. Sprinkle with fresh rosemary, if you feel so inclined.


Friday, March 9, 2012

Spinach and Ricotta Stuffed Portobello Mushrooms

Photo courtesy of Angie McGowan
Another Pinterest find for our meatless Lenten dinners.  I think it was the picture that sold me.... believe me, if I had posted the pic of what MINE looked like, you'd maybe be clicking the little red X in the corner.....

I liked it a lot, but Abe really enjoyed it, which is surprising since I'm the veggie in the family.  I think if I make it again, I might try a drizzle of balsamic over the top of the mushroom before adding the cheeses.  I thought it could use a bit of acid.

I only made one addition to the recipe, adding some garlic in.  Make sure to keep an eye on your cheese.  I didn't check mine until close to the 18 minute mark and the cheese was very brown.  Still tasted good, but not as appealing.


Here is a link to the original recipe


Spinach and Ricotta Stuffed Portobello Mushrooms
Serves 4

4 portobello mushroom caps, stems and gills removed
Olive oil
1 cup ricotta cheese
1 cup mozzarella or Italian blend shredded cheese
2 – 9 oz bag fresh spinach
1/2 onion, sliced
1/2 red pepper, sliced
3 cloves of garlic, minced
Olive oil
Salt and pepper


 Preheat oven to 400 degrees. Rub olive oil all over the outer part of your portobello mushrooms.

 Preheat a large skillet and drizzle with olive oil. Add onions, garlic, red peppers and spinach. Add salt and pepper. Saute until spinach is wilted.

 Spoon 1/4 cup ricotta cheese in each mushroom cap. Top with 1/4 of the sauteed spinach. Then 1/4 of the shredded cheese.

 Bake at 400 degrees for 18 – 20 minutes or until cheese is melted and mushrooms are tender.


Wednesday, March 7, 2012

Spicy Honey Glazed Chicken

Photo courtesy of Nutmegnanny.com


I was a bit slow when it came to the whole Pinterest craze.  I mean, I was still trying to figure out the new layout of my Facebook and didn't have the bandwidth to try some new fangled site.  Not to mention, I have enough places to waste my time online.

Then Lent came and I decided to meet Jimi's challenge of "So, what are YOU going to give up for Lent?" with an actual answer this year..... my beloved internet message board that time-sucks much of my free time.  Sob.  So, not to go all Civil War era and give up internet all together, I figured I had more time to check out Pinterest.  And boy, what a gold mine for recipes (not to mention, how cool is it for me to find MY site pinned?)!

This recipe sounded yummy, even to a vegetarian like me.  Sweet and spicy.  Love the marriage.  It's so simple, not to mention uses ingredients you most likely have on hand, which is perfect for weeknights. Abe loved it, but Adam found it too spicy.

The recipe called for chicken thighs, but I used breasts.  Any cut will work.  If you are using bone-in, add 5-7 minutes to cook time.  Oh, and open a window because your smoke alarm might go off, like mine did. 

The recipe came from nutmegnanny.com.

Spicy Honey Glazed Chicken
Serves 4

8 boneless skinless chicken thighs (or 4 large boneless breasts)
1 teaspoon kosher salt
1 teaspoon fresh cracked pepper
1 teaspoon red pepper flakes
1 teaspoon chili powder
2 teaspoons paprika
2 teaspoons garlic powder
1/2 cup honey
2 tablespoons apple cider vinegar

Mix spices together and set aside.

Mix honey and cider vinegar and set aside.

Un-tuck chicken thighs so they are flat. Cover both sides in seasoning, set flat onto sheet pan. When all chicken as been seasoned put under broiler.

Cook for 5-7 minutes on one side and flip.  Cook for a 5-7 minutes on other side.  Flip again and then baste the chicken in honey/cider mixture.  Be sure to really get the chicken covered.  Add to oven again and let it cook under the broiler for a few minutes until the honey starts to thicken up and glaze.  Add an extra swipe of honey if you like your chicken nice and sticky.

Take chicken out of oven and let rest for a few minutes.


Related products:


Monday, March 5, 2012

Lemon Garlic Chicken

Photo courtesy of Ina Garten

No huge story behind this one.... simply, I was watching Barefoot Contessa and saw her make this and just knew that Abe would love it.  So, I ran to the computer... ok, who am I kidding, the computer is pretty much always nearby... and pinned this recipe on my recipe board.

And, as predicted, Abe loved it.  Jimi really liked it too.  It was so simple to make too... simple ingredients making simply delicious food.  As Ina Garten would say... can't beat that! 

The recipe called for boneless chicken breasts, but I felt like using up some bone-in chicken thighs.  It worked out perfectly.  I made sure to add 5 minutes to the cook time due to the bones. 

I served the chicken with rice to soak up the sauce and a mixed green salad.

Lemon Garlic Chicken
Serves 4

1/4 cup olive oil
3 tablespoons minced garlic (9 cloves)
1/3 cup dry white wine
1 tablespoon grated lemon zest (2 lemons)
2 tablespoons freshly squeezed lemon juice
1½ teaspoons dried oregano
1 teaspoon minced fresh thyme leaves (or 1/4 teaspoon dried)
Kosher salt and freshly ground black pepper
4 boneless chicken breasts, skin on (6 to 8 ounces each) (or whichever cut of chicken you have)
1 lemon

Preheat the oven to 400 degrees.

Warm the olive oil in a small saucepan over medium-low heat, add the garlic, and cook for just 1 minute but don’t allow the garlic to turn brown. Off the heat, add the white wine, lemon zest, lemon juice, oregano, thyme, and 1 teaspoon salt and pour into a 9 X 12-inch baking dish.

Pat the chicken breasts dry and place them skin side up over the sauce. Brush the chicken breasts with olive oil and sprinkle them liberally with salt and pepper. Cut the lemon in 8 wedges and tuck it among the pieces of chicken.

Bake for 30 to 40 minutes, depending on the size of the chicken breasts, until the chicken is done and the skin is lightly browned. If the chicken isn’t browned enough, put it under the broiler for 2 minutes. Cover the pan tightly with aluminum foil and allow to rest for 10 minutes. Sprinkle with salt and serve hot with the pan juices

Thursday, February 23, 2012

Quinoa Pilaf in Lettuce Cups

Photo courtesy of Food Network
This week starts the Lenten season.  While my family never celebrated it, Abe's family is Byzantine Catholic, so Lent is near and dear to his heart.  In addition to giving something up for 40 days, you also go meatless (and some days vegan) on certain days.  Meatless Monday, in the Byzantine tradition, is 2 days before many others start Lent and involve giving up all meat, dairy and eggs.  Ash Wednesday is another vegan day.  The rest of the season, we will be meatless on every Wednesday and Friday.  You know this vegetarian is thrilled!

Yesterday I decided to make something a little different for us.  Well, for Abe, that is.  I love quinoa and make it for myself and the kids for a quick and healthy lunch.  A good friend is hosting a ladies brunch (sounds so grown up, doesn't it?) this weekend and requested a quinoa dish.  So, I thought I'd test drive this one.

I loved it.  Abe enjoyed it, but he keeps insisting he's not the biggest fan of quinoa.  He added a bit more hot sauce to his and did finish it.  But I noticed he didn't take the leftovers for his lunch.  His loss is my tummy's gain.

This recipe is perfect for a high-protein, low-carb lunch or dinner.  The base recipe is one I got from Aarti Sequira from Food Network.  I doctored it up to make it to my taste.

Quinoa Pilaf in Lettuce Cups
Makes 4 servings

1 1/2 cups stock (veggie or chicken or even plain water)
1 cup quinoa, picked and rinsed well (make sure to rinse or it will be bitter)
2 tablespoons olive oil
1 medium red onion, finely chopped
1 teaspoon turmeric
1/2 teaspoon ground coriander
1/2 teaspoon ground ginger
3/4 teaspoon garam masala
2 stalks of celery, diced
2 tablespoons chopped dried cherries  (or any dried fruit you like)
Kosher salt and freshly ground black pepper
1 lemon or orange, zested, plus 2 tablespoons juice
1 head Boston lettuce, leaves separated

Bring the stock and quinoa to a boil in a small saucepan over medium heat. Reduce the heat and simmer, covered, until quinoa is cooked and curly white germ shows, about 20 minutes.


Meanwhile, warm the olive oil in large skillet over medium heat. When the oil is shimmering, add the onion and spices, and saute until the onion has softened and the spices are very fragrant.


Stir in the celery and fruit and saute for 1 to 2 minutes.


Add the cooked quinoa (all the stock should have been absorbed) to the skillet. Stir in the lemon zest and lemon juice. Taste, and season with salt, pepper, to taste. Allow to sit off the heat for 10 minutes so the flavors seep into the quinoa.


Serve in lettuce cups with radish slices, soy sauce and Asian chili sauce on the side.

Saturday, December 3, 2011

Freezer Egg McMuffins

Crappy phone camera- my camera is still in the shop
I'm new to Pinterest.  I have friends who talked about this awesome website that allowed them to find new ideas, be it fashion, food or photo inspiration, but I never went on.  Frankly,  I had way too many internet distractions keeping me from being a fully-functional adult.  Add one more thing and I feared that my kitchen floor would never get mopped. 

But then I caved and peeked.  And fell in love with the site.  What a great way to, like my friends said, get inspired.  Granted, I can already see the possibility of me getting a bit of Pinterest Insecurity Syndrome, a disorder where you're sense of what your world looks like vs what you think your world should look like based on these "pins" you see on your friends "boards" just don't ever match up.

One of my first projects from my Pinterest inspiration came just in time.   We've been having a lot of scrambled mornings where somehow breakfast was last on our minds and in our bellies.  Wednesday, in fact, I was so scattered that I forgot to eat it altogether and spent a very hungry morning testing kids.  Not a good way to focus.  So when I came across this idea for a quick breakfast, you know I pinned it.

The entire process takes about 15 minutes to prep.  Add the hour to freeze (which I will admit I forgot to do completely) and you've got breakfasts for almost 2 weeks.  Well, that's if you want to eat them every day.  I don't think I could stomach that much egg, but I know many who would love it.  Adam, however, was so kind to remind that he does not like eggs when I was making them.  Don't worry, Buddy, I remembered.

Using the muffin tin is brilliant.  It makes the eggs just the right size and shape.  Use cooking spray and they will slip out in perfect shape.  

Here is my Pinterest inspiration.  http://www.macheesmo.com/2010/03/breakfast-sandwiches/


Freezer Egg McMuffins
Makes 12

12 eggs
12 English muffins (I used whole wheat)
Shredded cheese

Preheat oven to 350 degrees.

Spray muffin tin with cooking spray.  Add eggs to each tin.  Bake for 10-15 minutes or until set.

While you are cooking your eggs, split the muffins and lay them on a baking sheet and toast them in the oven. 

When eggs are set, remove from the muffin tin.  Place muffin bottoms on cookie sheet. Assemble shredded cheese and egg on each muffin.  Place completed muffins on the cookie sheet, uncovered, into freezer for 1 hour to remove some of the moisture.  Then wrap each muffin in tin foil or plastic wrap and store in a freezer bag.

To reheat, several suggestions were made.  One is to reheat in an 350 degree oven for about 20 minutes while you're getting ready for work.  Another was if you had to use the microwave to wrap it in a damp paper towel and microwave until defrosted. 

I'd say the oven method is best, but I'm sure the microwave will be tested on those mornings I'm so harried that even turning on the oven escapes my radar. 

Tuesday, November 22, 2011

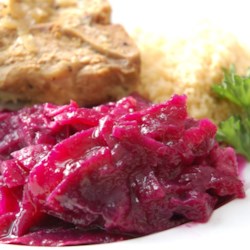
German Red Cabbage

Photo courtesy of cookin mama via Allrecipes.com
One of the foods that instantaneously brings me back to my mom cooking in the kitchen is her red cabbage.  The smell and taste says Mom.  It's tangy and sweet at the same time and has a bit of spice from the clove and bay leaf.  I could literally eat it all day long and would request it for part of my last supper.  Adam LOVES it so much and calls it "Oma's Purple".

It's chock full of vitamins and is a great way to use up that red cabbage you bought on sale, but had no idea what to make with it.  It goes great with pork and chicken dishes, especially.

If getting a large cabbage, you might have to increase spices, sugar and vinegar.

You really should use whole cloves, peppercorns and allspice berries.  I know many won't have that in their pantry, but it's good to have on hand.  If you absolutely don't want to get the whole berries, I'd use 1/8 teaspoon ground clove, 1/4 teaspoon ground allspice and a good couple of grinds of ground pepper.  Add a pinch more at the end of the cooking if it needs more, but be very careful with these strong flavors!

If you don't have a spice bag or a piece of cheesecloth, just add the whole spices and pick the large pieces out before serving.

German Red Cabbage
Serves 6


1 medium head red cabbage, cored and sliced
2 large tart apples, peeled and sliced
1 medium sweet onion, sliced and separated into rings
1 1/2 cups water
1 cup cider vinegar
1/2 cup sugar
1 tablespoon butter
1 teaspoon salt
6 whole peppercorns
2 whole allspice
2 whole cloves
1 bay leaf
2 teaspoons cornstarch
2 teaspoons cold water


In a Dutch oven, toss cabbage, apples and onion. Add water, vinegar, sugar, butter and salt. Place the peppercorns, allspice, cloves and bay leaf on a double thickness of cheesecloth; bring up corners of cloth and stir with kitchen string to form a bag. Add to Dutch oven. Bring to a boil. Reduce heat; cover and simmer for 1-1/4 hours.
 
Discard spice bag. In a small bowl, combine cornstarch and cold water until smooth; stir in cabbage mixture. Bring to a boil; cook and stir for 1-2 minutes or until thickened.

Wednesday, August 31, 2011

20 Dinners, 1 Day: Easy Brunswick Stew


I have no idea what Brunswick Stew is and have never heard of it before.  Whatever it is, it was such an easy and tasty stew that Abe had to pack his lunch portion pretty quickly or it would've been eaten up that night.

Using bagged frozen veggies made it crazy quick to make.  Abe actually questioned what kind of stew only needed 10 minutes to cook when he called to tell me he was on his way home from golf league and I told him I had to start the stew.  I admit, I wondered too.    But it was surprisingly good!  And talk about healthy.... I don't think you can cram anymore vegetables in there if you tried.  I sectioned off 1/2 of the stew before adding the pork for myself and added the pork to Abe's portion.  So tasty!  You could easily substitute chicken or even omit the meat altogether for a hearty vegetarian meal.

Oh and don't be a ding dong like me and look for the frozen combo of ALL of the veggies.  I spent a good 5 minutes looking through the freezer section for this elusive blend.  Only later when home did I reread the ingredients and realize it asked for bags of EACH veggies.  Duh.

Easy Brunswick Stew

1 onion, finely chopped
2 tablespoons olive oil
2 cups Pulled Pork
1 package (10 oz) each frozen corn, baby lima beans, sliced okra and peas-and-carrots combo, thawed
2 cups Tomato Sauce
2 cup beef broth (I used vegetable broth)
salt and pepper
4 slices crusty bread

In a large dutch oven (or pot), cook onion in olive oil over medium heat until tender, 5 minutes.  Add pork and cook 1 minute.  Add thawed vegetables, tomato sauce and broth.  Cover and simmer until vegetables are tender, 5 minutes.  Season with salt and pepper.  Serve with bread.

Monday, August 29, 2011

20 Dinners, 1 Day: Veggie Flatbreads with Hummus

I think I've found my new go-to dinner when things are harried and I haven't even thought about what to make for dinner.  Even Abe commented on how yummy these were and how quick of a dinner it makes.  I have a feeling once the school year/football practice season is in full swing,  I'll be cranking out a lot of these in different variations.

Who knew that hummus on pizza crust was so tasty?  Well, I guess Rachael Ray did since this is her recipe.  But honestly, who knew?  Abe did raise an eyebrow at the idea. Being Middle Eastern himself, I know he was thinking I was going to ruin a perfectly good hummus.   But, one bite, and he was sold.

I found the flatbreads in the bakery section.  If you can't find them, pocketless pitas will do too.

You might also think "Um, butternut squash and fennel on my pizza? Are you crazy?"  But I assure you, it's actually good.  The peppers and onion add just enough flavor to tone down the sweetness of the butternut and the fennel adds a nice twist, so it's a perfect compliment.  And, don't skimp on the olives.  Yum.

Veggie Flatbreads with Hummus

1 small fennel bulb, shaved
3 tablespoons olive oil
4 naan, flatbread or pocketless pitas
3/4 cup hummus
1 cup chopped Roasted Squash
1 cup chopped Roasted Peppers
1/4 cup chopped black olives
3 tablespoons chopped fresh parsley

Place racks in upper and lower thirds of oven and preheat to 500 degrees.  In bowl, combine fennel and 1 tablespoon olive oil.  Brush naan on both sides with remaining 2 tablespoon olive oil; place on 2 baking sheets.  Spread 3 tablespoon hummus on each naan; divide fennel among naan.  Bake until toasted, 10 minutes.  Sprinkle with squash, peppers, olives and bake until crisp, 5 minutes.  Top with parsley.

Monday, August 8, 2011

Broiled Salmon with Citrus Glaze


Sometimes with cooking, as with life, less is more.  This recipe is so basic, yet so flavorful you could serve it up to company.  Just make sure you have extra since it will go fast.  Abe loved every single bite and kept saying "Mmmmm.... this is good!" the whole time.

I served it with mashed potatoes and steamed asparagus.

I got the recipe from Foodnetwork.com.

Broiled Salmon with Citrus Glaze
Serves 4

1 side, skin-on salmon, 1 1/2 to 2 pounds, pin bones removed
1/3 cup dark brown sugar
2 tablespoons lemon zest
1 1/2 teaspoons kosher salt
1/2 teaspoon freshly ground black pepper

Position a rack in the oven 3 inches from the broiler. Line a cookie sheet with aluminum foil and place the salmon on the pan.


Place the sugar, zest, salt, and pepper into a food processor and process for 1 minute or until well combined. Evenly spread the mixture onto the salmon and allow to sit for 45 minutes, at room temperature.


Turn the oven on to the high broiler setting for 2 minutes. After 2 minutes, place the salmon into the oven and broil for 6 to 8 minutes or until the thickest part of the fish reaches an internal temperature of 131 degrees F on an instant-read thermometer. Remove the salmon from the oven and allow to rest, uncovered, for 8 to 10 minutes. Serve immediately.

Monday, July 18, 2011

Buttermilk-Brined Pork Chops


I decided to try to get back into menu planning again.  Lately too many dinners were decided about 20 minutes before Abe came home and consisted of Boca burgers or Abe making himself tuna salad.  So, out came the flyer for what's on sale this week at the grocery store and my trusty list of cooking books and websites.  Ah.  Add a cup of coffee and this girl's in heaven.

This recipe is very simple and tasty.   You will need to brine it overnight, so plan that into your schedule.  They come out moist and delicious!

I served it with a baked potato and sauteed veggies.

I got this recipe from CookingLight.com. 

Buttermilk-Brined Pork Chops
Serves 4

2 cups buttermilk
2 tablespoons kosher salt
2 tablespoons sugar
1 tablespoon grated lemon rind
1 teaspoon chopped fresh rosemary (or about 1/3 teaspoon dried)
1 teaspoon chopped fresh sage (or about 1/3 teaspoon dried)
4 (6-ounce) bone-in center-cut pork chops (about 1/2 inch thick)
2 teaspoons freshly ground black pepper
Combine first 6 ingredients in a large zip-top plastic bag; shake well to dissolve salt and sugar. Add pork; seal and refrigerate overnight, turning bag occasionally. Remove pork from bag; discard brine. Pat pork dry with a paper towel. Sprinkle pork with pepper.
Heat a large nonstick grill pan over medium-high heat. Coat the pan with cooking spray. Add pork; cook 3 1/2 minutes on each side or until desired degree of doneness.