Monday, July 1, 2013

Steak and Black Bean Crock Pot Chili


It's been a while since I've posted a recipe.  Life has become hectic between the kids, work, the husband and my new little  play dough business (Love Bubs Scented Play Dough- check it out!).  So, trying out new recipes have taken a bit of a back seat.

I do apologize.

A big change that has happened in our house is that Abe got braces today.  He had bite issues that was causing some issues, so after a lot of thought and consultation, poor Abe had to get braces at the young age of 45.  Brought me back to, um, middle school.

Since he can't eat and we had a defrosted steak that needed to be used up, I searched for a way to cook the steak down enough that Mr. Brace Face (don't worry, he lets me use that term) could eat.

And yes, it's the first day of July and I'm making chili.  Crazy lady.  But it was a cold and rainy July 1st, so I think I got away with it.

The chili was a hit with both Abe and the kids.  Ava actually licked her bowl and she's been hard to get any food in her belly lately.  So, that's a good sign.    The meat sort of shreds and blends into the chili and Abe said there was a good balance of spices.  

Serve with sour cream, shredded cheese and jalapeno, if you like it spicy.  Corn muffins and a green salad would be a yummy addition, too.

I got the recipe from Food.com.

Steak and Black Bean Crock Pot Chili
Serves 6


2 lbs boneless beef cubes, for stew
2 teaspoons chili powder
1 teaspoon garlic powder
1 teaspoon ground cumin
1 large onion, chopped
1 large green pepper, chopped
2 (15 ounce) cans black beans
2 (14 1/2 ounce) cans chili-style chopped tomatoes
1 teaspoon sugar
1 (6 ounce) can tomato paste
salt and pepper, to taste
sour cream
shredded cheddar cheese

Cut the beef into 1-inch cubes.

1. Place beef in slow cooker and turn it on low.

2. Sprinkle the chili powder, garlic powder and cumin over the meat.

3. Add onion and green pepper.

4. Drain and rinse the cans of beans and add them to the slow cooker.Add tomatoes and sugar.

5. Cover and cook on low for 8 to 10 hours.

6. Uncover and sir in the tomato paste. Season with salt and pepper.

7. Garnish with sour cream and cheddar cheese.

Related products

Monday, March 11, 2013

Yummy Black Bean Soup

Image via Google

I love a good black bean soup.  Warm, hearty, tasty and I don't feel guilty if I go back for a second bowl (and then another one in the evening). 

Abe's been watching his waistline again, so after indulging in some less-than-healthy food the day before, he requested a healthy dinner the next morning.  And I happily agreed.  Until it was about 30 minutes before he was to come home and I had forgotten about dinner.  Oops.

A bit panicked, I remembered I had a bunch of black beans in the freezer.  So, black bean soup it was.  I looked around for a recipe that would be a bit different than the sometimes bland ones I've made in the past.  I hit the jackpot with this one! I think it's the best black bean soup I've made in a while.

So easy and so yummy.  The celery seed and cumin add a bit of a twist and you can spice it up or keep is on the mild side for the kids by reducing the pepper flakes, like I did.  A bottle of hot sauce at the table will let the braver ones add more heat.

Full of fiber and protein, this will stick to your ribs during a cold night.  It freezes well, too, so double up and you'll have dinner waiting for you the next time you're like me and forget to cook. 

I served with a leafy green salad.

Recipe from Melissa D'Arabian.

Yummy Black Bean Soup 
Serves 4-6

2 celery stalks, chopped
1 carrot, chopped
1 onion, chopped
3 tablespoons olive oil
2 teaspoons dried oregano
1 teaspoon ground cumin
1/2 teaspoon red pepper flakes
1/2 teaspoon celery seeds
3 cloves garlic, minced
2 cups cooked black beans
1 tablespoon vegetarian (or chicken bouillon base)
1 bay leaf
One 14-ounce can diced tomatoes
Kosher salt and freshly ground black pepper
 
Cook the celery, carrots and onions in the olive oil in a large saucepan over medium heat until soft, about 5 minutes. Add the oregano, cumin, red pepper flakes, celery seeds and garlic and cook until fragrant. Add the black beans, bouillon, bay leaf and tomatoes, and enough water to cover by an inch or two (about 3 cups). Simmer for at least 30 minutes, up to 2 hours, adding water if needed. Season and serve.


Saturday, December 22, 2012

Product Review and Giveaway: Loeb's Onion Crunch


When I was contacted by Loeb's Onion Crunch to do a review, I'll admit that my first thought was "Oh oh, I hope I am going to like it or I won't be able to give a good review".  We're not a fried onion product kind of family.  I haven't bought or eaten it in probably 15 years.  When we eat fried onions, we do it ourselves.

The package came and smiled a bit at the very happy onion on the jar.  The jar is easy to open and shake out.  I cracked it open and shook some into my hand and into my mouth.  Um, yum.  I was fully expecting some greasy soggy onion bits.  These were light, crunchy and you could really taste the sweet onion flavor.  They weren't super salty either.

Since I'm being candid, I will admit that I put them aside for a while since I had no idea how to use them.   I mean, I could've done the classic green bean casserole that you think of fried onion product. I gave it a good faith effort and bought green beans, but in the rush of holiday and work and kids, I forgot and they went bad.  I was feeling a bit desperate to come up with some fancy dish to showcase these onions.  And I was having cooking-block.

Then finally, I thought I'd just sprinkle them on some eggs I had made.  And it was delicious.  It added a delightful crunch and flavor.  So then I tried it on my soy dog.  Yummmm.   I even tried it on a sandwich and again, it added a subtle onion fried goodness with a great crunch.  I convinced Jimi to try it on his eggs and after an initial "Really??", he was sold and enthusiastically nodded a yes when Abe asked if it was good.

I've sprinkled them on the frozen veggies I've made for dinners.  I'm going to try it on salads.  I bet they will add a yummy texture element (see, there's the foodie touch you've been looking for!).

They are simply onion, palm oil, wheat flour and salt. Crunchy yummy goodness.

Check them out to perk up a lot of your dishes!   http://www.onioncrunch.com

*I have received a sample of this product to review, but have not been compensated.  My opinion is my own.*

Now, time for a giveaway!!  Want to try Onion Crunch for yourself?  Enter to win!


Saturday, December 1, 2012

The Best Meatloaf

Courtesy of myrecipes.com


I'll admit.... I'm not really a fan of meatloaf.  I mean, before becoming a veg-head, I'd eat it when my mom made it. I always covered in tons of ketchup to make it palatable and only ate it because the wrath of my mom wasn't worth risking.

As a wife and mom myself, I never really consider making it.  I tried it once a while ago and it was a disaster.  So, when I was, yet again, panicking at 3:00 about what to make for dinner, I surprised the heck out of myself by thinking "Hey, frozen ground beef.... MEATLOAF!"  Abe even had a pause of surprise in his voice when he called to ask what was for dinner.

I found a recipe that had a lot of great reviews and seemed to have a lot of flavor to it and wished for the best.

It was a huge hit!!  Abe's exact words were "Wow, this is.... great!"  Jimi gave me a thumbs up while munching away and went back for a second serving.  Adam told me it was yummy.  Ava played with her food, like usual, and then begged for a yogurt once the dishes were done.  That's another story for another setting....

I messed up slightly with the seasoning, so I'm going to write the recipe the way I made it.  Base recipe is from myrecipes.com.

The recipe calls for patting out a free-form loaf instead of using a loaf pan.  My limited experience with meatloaf seems to agree. I just put it on plastic to keep the bits together and smushed out the shape best I could (throwing away the plastic, of course).  I resisted the urge to add more binders, as I knew that would make the loaf more dense. 

Oh and don't be like me and forget that you need to defrost the meat before making the meatloaf.  I rarely make anything with ground beef and it's always tacos which can be defrosted as you cook.  Oops.  Thankfully the microwave did a good job of defrosting on the spot.

The Best Meatloaf

1 tablespoon butter
3 celery ribs, finely chopped 
1/2 large onion, finely chopped 
2 pounds lean ground beef 
3 tablespoons Worcestershire sauce, divided
1/2 cup Italian-seasoned breadcrumbs (or any kind of breadcrumbs with some Italian herbs added)
1/3 cup ketchup 
2 teaspoons Creole seasoning (I used Cajun as that's all I had)
1 teaspoon Greek seasoning
1 teaspoon garlic powder
2 large eggs, lightly beaten 
1 (8-ounce) can tomato sauce (I used spaghetti sauce)
3 tablespoons tomato paste
1 tablespoon ketchup 


Melt butter in a medium nonstick skillet over medium heat; add celery and onion, and sauté 7 minutes or just until tender.

Stir together celery mixture, ground beef, 2 tablespoon Worcestershire sauce, breadcrumbs, and next 5 ingredients in a large bowl. Shape into a 10- x 5-inch loaf; place on a lightly greased broiler rack.

Place rack in an aluminum foil-lined broiler pan.

Bake at 350° for 45 minutes. Stir together remaining 1 tablespoon Worcestershire sauce, tomato sauce, tomato paste, and 1 tablespoon ketchup until blended; pour evenly over meatloaf, and bake 10 to 15 more minutes or until no longer pink in center. Let stand 10 minutes before serving.

Friday, November 2, 2012

Asian-Glazed Chicken Thighs


What was just a throw-together "Oh my god, dinner is coming up and I have no recipe!" moment turned into what Abe titled as One Of My Best Chicken Recipes, Ever.     Top 3, he said.  Sweet and slightly spicy and yum.

Hey, I'll let him think I carefully perused the recipes to find just the perfect one for him.  Sometimes, the best results come from accidents.

He had to stop himself from eating all 8 chicken thighs.  I had to pack them away for lunch, actually..lol.

I had to modify the recipe for what I had at home, so I'm going to post that recipe since it was the winner.

Base recipe found on www.allrecipes.com.

Asian-Glazed Chicken Thighs
Serves 4


1/2 cup rice wine vinegar
5 tablespoons brown sugar
1/3 cup soy sauce
1/4 cup sesame oil
3 tablespoons Asian chili garlic sauce
3 tablespoons minced garlic
Salt to taste
8 skinless chicken thighs


Whisk the vinegar, brown sugar, soy sauce, sesame oil, chili garlic sauce, garlic, and salt in a bowl until smooth. Pour half the marinade into a large plastic zipper bag; retain the other half of the sauce. Place the chicken thighs into the bag containing marinade, squeeze all the air out of the bag, and seal. Shake a few times to coat chicken; refrigerate for 1 hour, turning bag once or twice.

Preheat oven to 425 degrees F (220 degrees C).

Pour the other half of the marinade into a saucepan over medium heat, bring to a boil, and cook for 3 to 5 minutes, stirring often, to thicken sauce. Remove the chicken from the bag; discard used marinade. Place chicken thighs into a 9x13-inch baking dish, and brush with 1/3 of the thickened marinade from the saucepan.

Bake 40 minutes, basting one more time after 10 minutes; an instant-read thermometer inserted into a chicken thigh should read 165 degrees F (75 degrees C).


Tuesday, October 30, 2012

Giveaway Time!


Giveaways are everywhere lately, it seems.  I've come across one that I thought some of you guys might be interested in, so I had to share it!  It's not food related, but it's a great one!

Anyone with a baby nursery or a child's room has seen the beautiful wooden wall letters that spell out the child's name or an inspirational word.   They add a lovely and personal touch to the room.

Pink Taffy Designs, a baby boutique, is hosting a giveaway where you can have a chance of winning a set of wall letters, valued at $23.99 per letter!  I know I'd love a set of these in my kids' rooms (hint, hint). :)

Entry is simple and I'm adding a link to the contest right below.  Just click and you're all set! The contest runs for the next couple of weeks.

Hope you win!  Come back and make sure to tell me if you did.

 a Rafflecopter giveaway


Monday, October 22, 2012

Garlic Hummus


Abe is the breakfast cook in this house.  I cook the vast majority of dinners, but if there's a weekend breakfast being whipped up, you're likely to find my man at the stove.  It's a girls' dream. :)

One of his famous breakfasts is his garlic hummus.  It was taught to him by his mother, who was taught by her mother and so on.  Middle Eastern cooking at its finest.  When I first saw him make it, I was surprised to see him boiling the chickpeas right in the can on the stove.  While I convinced him to start doing it in a pot, he still makes it sometimes like that.

The recipe is in Abe's words.  It will be some of the yummiest hummus you'll ever have (those are my words).  Make it for breakfast, a quick dinner or anytime!


Garlic Hummus

1-3 cloves fresh garlic
Dash of cumin
1/2 teaspoon salt
3 tablespoons tahini
3 tablespoons lemon juice
1 tablespoon olive oil
1 can of chickpeas  (or equivalent dry chick peas, soaked over night in water)
1 tablespoon plain yogurt

Bring can of chickpeas to a boil.

Grind the garlic in a food processor.  1 clove minimum.   3 cloves gives a fairly strong garlic flavor (more than that can be certified Garlic Flavor). Add tahini, salt, cumin, lemon juice, olive oil.

Using a straining spoon, add the chickpeas.  Save the liquid from the chick peas.

Add the contents of the pot to the food processor.  After initial grind, add tablespoon plain yogurt.
Continue food processing, slowly adding liquid from the chick pea boil until you get your desired consistency.    Be careful, once you get too liquidy, it is tough to go back...

During final processing, one could add flavors....fresh parsley or fresh cilantro, or even roasted peppers.

Serve on plate, adding a dash of paprika if desired, but most definitely a table spoon or two of olive oil.

Wednesday, October 10, 2012

Crock Pot Beef Dip Sandwich

Courtesy of Google Images

Abe went to Boston to visit a life-long friend.  We was gone for 5 days, so long enough for me to really miss him (you know the first few days are known as Oh Good, I Can Watch Real Housewives Without Ridicule Days).  So, I wanted him to come home to a special treat.

This recipe is crazy easy.  Like, I was a bit embarrassed at how much praise I got because all I did, really, was dump some stuff in a crock pot and walk away.  But, hey, I'll take it.

Can also be made in a covered dutch oven in the oven at 275 degrees for 5-6 hours.

I adapted this recipe from The Pioneer Woman. 

Crock Pot Beef Dip Sandwich


1 whole beef chuck roast, 2.5 To 4 pounds
1 can beef consomme Or beef broth
3 Tablespoons Italian seasoning (I used a packet of Italian salad dressing)
1 teaspoon salt (don't add if you are using salad dressing)
1 teaspoon minced garlic
1/4 cup water
1/2 jar (16 Oz) pepperoncini peppers, with juice
 
Buttered, toasted deli rolls
Cheese of your choice 

Combine all ingredients in  crock pot.  Cook on high for 5-6 hours or low for 9-10 hours or until fork tender.

Remove from crock pot. With two forks, completely shred all meat, leaving no large chunks behind.

Serve on buttered, toasted rolls with some of the peppers, if desired. Top with cheese and melt under the broiler if desired. Serve with juices from the pot.


Friday, October 5, 2012

Pumpkin Spice Latte


Autumn.  My favorite season.  The days get cooler.  The trees change colors.  Halloween.  Tank tops and flip-flops are packed away, replaced by sweaters and boots. 

For many, me included, Starbucks' pumpkin spice latte is tasty and addictive tradition of the season.  Only here for a while, millions flock to get their fix. 

As yummy as it is, the cost starts to add up at $3.50+ a pop.  Not to mention, sometimes I just want one and I'm just to dang lazy to leave the house.

So, I decided to look up how to make one at home.  And, wow, it's a damn good and freakishly easy.

And it's all natural, no weird syrups and you can control the sugar content and what level of spice you want. 

Store extra pumpkin puree in the refrigerator for your next pumpkin spice latte fix or even yummy pumpkin pancakes or muffins. 

Brew coffee with double of grounds that you normally do.  For an extra kick, add a teaspoon of instant espresso.   And, of course, if you have an espresso machine, use the real stuff in place of the coffee.

Full milk makes it nice and creamy, but it's just as delicious with reduced fat milk. 

Pumpkin spice can be made at home, by the way.  Equal portions of cinnamon, nutmeg, allspice and ground ginger can be stored in an old spice jar.

Recipe adapted from recipegirl.com.

Pumpkin Spice Latte
Makes 1 drink

1/2 cup whole milk
2 tablespoon unsweetened canned pumpkin puree
1 teaspoon packed light brown sugar
1/4 teaspoon pumpkin pie spice (add a bit more if you like it spicier)
1 teaspoon vanilla extract
1 cup hot brewed, strong coffee
2 tablespoons half & half cream
1 teaspoon granulated white sugar, or more to taste
whipped cream, optional
ground nutmeg


1. In a glass measuring cup or microwave-safe bowl, whisk together milk, pumpkin, brown sugar, spice and vanilla. Microwave for 1 to 2 minutes until it's hot and frothy.

2. Pour the pumpkin milk into a tall mug or glass. Add hot coffee. Pour in the cream. Add a teaspoon of sugar. Stir, and taste. Add more sugar, if desired.

3.Add optional whipped cream and nutmeg and enjoy hot!

Related items:

Sunday, September 23, 2012

Crockpot Chicken Cacciatore


It was football day today and the little kids and I were going to join Abe to root their big brother on.  Which meant I wouldn't be home in time to cook.  Enter one of my 3 crockpots.  Yes, I have 3 and could easily see myself getting another soon.

My chicken thighs were frozen, so I set the crockpot at high for the first 2 hours to defrost them and then switched over to low.  If yours are defrosted, just stick to the low.

I didn't have the green pepper that the recipe called for, but the family loved it just the same.  So, don't feel pressure to run to the store just for the pepper.  I added some baby carrots to use them up and it seemed to go nicely, even though I don't think carrots are traditionally in cacciatore.

The house seemed like a fabulous Italian dinner when we got home.  Even this vegetarian thought it smelled yummy.

I tried to use the cornstarch and water slurry to thicken the liquid up, but the hungry crew staring at my back at the stove made me feel it best to hurry, so it was more like a delicious broth than a sauce.  If I had more time next time, I will give it the time it needs.

I served it over white rice, but egg noodles would be great too. 

Recipe adapted from Busycooks.about.com.

 Crockpot Chicken Caccitore
Serves 6

3 lbs. bone-in chicken thighs, skin removed
14 oz. can diced tomatoes with Italian seasoning
6 oz. can tomato paste
1 cup chicken broth
1 onion, sliced
4 cloves garlic, minced
1 green bell pepper, chopped
1 cup sliced mushrooms
1/2 cup dry red wine
1 tsp. dried Italian seasoning
1/4 tsp. pepper
3/4 tsp. salt
2 Tbsp. cornstarch
3 Tbsp. water

Place all ingredients except cornstarch and water in 4-5 quart slow cooker. Cover and cook on low 6-8 hours until chicken is thoroughly cooked and tender.

If you want a thicker sauce, combine cornstarch and water in small bowl and mix well. Stir into crockpot; cover and cook on low 15-20 minutes until thickened. Serve with hot cooked pasta, if desired. 6 servings

Related Items:

Friday, August 31, 2012

Easy Rice


For some, this is an unnecessary recipe.  Plain rice, nothing less, nothing more. Simple.  But for some, getting perfect rice is something that's not that simple.  

I know that I used to mess up rice like I was being paid.  It was either overcooked and mushy or it was uncooked and soupy.  Or worse, it would be burnt and stuck to the bottom of the pot.  Try washing that out by hand. Believe me, you don't want to.

I know some have rice cookers and have great success with them.  I excitedly bought one from Costco a while back, only to discover that I still was having control issues with the results.  So, I leave the rice cooker to steaming veggies and continue to cook my white rice on the stove top.  It comes out perfect every time, so why make it complicated.  Keep it simple, stupid and all of that.

The must-do tricks to have perfect white rice is as follows:

1)  Rinse your rice.  Yes, sounds strange, but unless you want sticky rice, like with making sushi or risotto, you want to rinse the extra starch off of the rice.  It makes for nice separate pieces of rice, for fluffy rice.  Just throw the rice in a fine strainer, rinse with cool water and then throw into the pot.

2) No matter the amount of rice you're making, it's always 1 part rice to 2 parts water/broth.  So, I do rice like my Arabic mother-in-law taught me.... I do one coffee mug of rice to 2 coffee mugs of water.  If you do 1 cup of rice, it's 2 cups of water.  1/2 cup of rice?  1 cup of water.  You get it.

3) Once cooking, DO NOT CHECK.  Don't peek at all.  Doing so will release the steam in the pot and will make for sticky rice.  You will be mad at yourself for doing so when you have ruined rice, so just don't.  Go by the time to know when your rice is done or do what I do, and go by sound.... I know mine is done when I can't hear the water boiling anymore.

For a great, fail-proof brown rice recipe, check here.

White Rice

1 part white rice
2 parts liquid (water or broth)

Place rice and water into a pot.  Set over high heat and heat, uncovered, until water starts to boil.  Once boiling, immediately cover and set to lowest setting.  Cook for 20 minutes.


Related items:


Friday, August 24, 2012

Cheesecake Filled Strawberries

Via Google Images

I needed a yummy treat to bring to a friend's brunch.  The thought of combining yummy cheesecake with fresh strawberries seemed like the perfect bite. 

It's crazy how easy these are to make.   You could even mix up a little of the cheesecake and keep it stored in the fridge to serve yourself up a tasty anytime snack.  Serve along side of french toast or waffles for an extra special breakfast. Drizzle with chocolate syrup or dolloped with whipped cream. So many ways to enjoy! 

Recipe from budgetsavydiva.com.


Cheesecake Filled Strawberries
 
10 strawberries
1/4 teaspoon vanilla extract
1/4 cup powdered sugar
4 oz. softened cream cheese or neufchatel cheese (low fat cream cheese works well)

Wash and dry strawberries.  Using a small knife, make an "x" cut 3/4 of way down strawberry.  Make sure not to cut all the way through.

Mix remaining ingredients in bowl.  Pipe into strawberries using a pastry bag or a plastic bag with the tip cut off.


Related items:


Thursday, August 16, 2012

Easy Homemade Applesauce

Image via Google Images


I can hear some of you now..... why on earth would anyone want to make something that you can easily buy in a jar?  My friend Michelle, in fact, teased me about just that.

There are a lot of reasons, including knowing what goes into the apple sauce, being able to control the amount of sugar and my favorite, awesome taste!  Homemade applesauce blows the jarred stuff out of the water.  And it's crazy easy to make, especially if you have the right tools.  It's a fun cooking activity for your little ones, too.

One tool that makes any apple dish easier is the apple corer.

 It's a simple and cheap tool that especially punches out the core.


Another tool is the apple slicer, which not only cores, but slices.


This works best if you peel first (I've made the mistake of not doing that and then having to peel each slice.  Not fun.


Now, if you want to get super fancy, you'd get yourself an apple peeler.  You could whip through a bag of apples in no time.   Some even core at the same time.


 I just use a good old fashioned paring knife and the peeling is done in no time.

The recipe is a base recipe and can be easily adjusted to taste.  Some like a very sweet applesauce, where others like a more tart one.  Spices are up to your taste, too.  The base recipe calls for cinnamon, but nutmeg and/or apple pie spice mix can easily be used.

The choice of apples is also yours.  Typically, you want a softer, sweeter apple, like  Red Delicious, Gala, Fuji, Winesap, McIntosh or Yellow Delicious.  I like a tarter choice too, like Granny Smith.  It's good to mix types if you can.  This holds the same for apple pies and crisps.   Pick organic apples, when you can, to keep pesticides and other not-so-good things from your tasty creation. 

Use up your applesauce in about 2 weeks.  Mine never ever lasts that long though.  It can be frozen too.

Homemade Applesauce


12 apples, such as Granny Smith or McIntosh
1 1/2 cup water
3/4 cup sugar (or to taste)
1/2 teaspoon cinnamon or apple pie spic mix (or to taste)
Peel and slice the apples into small pieces. Put apples in a pot

Add water to pot and bring to a low boil over medium heat, mashing apples as they cook down. Keep the pot covered.

When desired consistency, add sugar and cinnamon. Bring to a boil and then recover and remove from heat. Let cool in the pot and then refrigerate.


Base recipe from Pinch of Yum.

All images via Google Images.


Monday, August 13, 2012

Blueberry Buckle

Image via Google Images


I have a friend, Nancy, who is a bit of a baker.  In her past life, she was a cake decorator and now in her current life, she whips up yummy desserts whenever we have play dates with our kids.   Even her "failures" are eaten up with an intensity that borders on embarrassing.

So, when my friend said she was going to make a blueberry buckle, I was like "Wha? Huh?"  A buckle?  Never heard of one.  Turns out, it's sort of like a coffee cake with a crumble on top.  Not at all sure why it got a name like buckle.  Then again, how did an apple betty get called a betty? Why not Susy or Christine?  If the kids hadn't killed off my brain cells, I'd sit and ponder that for a minute....

I turned to the buckle when I needed to make a quick dessert for a family dinner.  The raves I got convinced me to keep making them.  This weekend alone, I have made 2.  A friend asked if the recipe was on my blog and I realized, sadly, no.  So, here it is!

Base recipe from Alton John at foodnetwork.com.

The measurements might look a bit strange.  The new trend in baking is to weigh your dry ingredients for more accuracy and better results.  Makes sense since baking is a science and your "level cup" might be more than mine.  If you have a food scale, use it (of course, zero out the container you're using).  If not, don't sweat it and just use the measurement.

The main recipe calls for blueberries, but I've used whatever berries I have at the house, even frozen mixed berries.  If you use frozen, make sure you drain the liquid off after they've defrosted.  You can also bake with the berries frozen, but sometimes I feel the cake gets too dry.  The spices can be anything like cinnamon, nutmeg or a combo.  The cake flour is good because it makes a very light cake; use all purpose if you don't have any.

Blueberry Buckle

For the cake: 

Nonstick cooking spray
9 ounces cake flour, approximately 2 cups
1 teaspoon baking powder
1/2 teaspoon kosher salt
1/2 teaspoon ground ginger
2 ounces unsalted butter, room temperature (4 tablespoons)
5 1/4 ounces sugar, approximately 3/4 cup
1 large egg
1/2 cup whole milk
15 ounces fresh whole blueberries, approximately 3 cups (or berries of your choice)

For the topping:

3 1/2 ounces sugar, approximately 1/2 cup
1 1/2 ounces cake flour, approximately 1/3 cup
1/2 teaspoon freshly ground nutmeg (or cinnamon or apple pie spice or combo)
2 ounces unsalted butter, chilled and cubed (4 tablespoons)
  
Directions

For the cake:

Preheat the oven to 375 degrees F.

Spray a 9 by 9-inch glass baking dish with nonstick spray and set aside.

In a medium mixing bowl whisk together the flour, baking powder, salt and ground ginger. Set aside.

In the bowl of a stand mixer, with the paddle attachment, beat together the butter and sugar on medium speed until light and fluffy, approximately 1 minute. Add the egg and beat until well incorporated, approximately 30 seconds. Add 1/3 of the flour mixture and beat on low speed just until incorporated and then add 1/3 of the milk and beat until incorporated. Repeat, alternating flour and milk until everything has combined. Gently stir in the blueberries and pour the mixture into the prepared baking dish.

For the topping:

In a small bowl combine the sugar, flour and nutmeg. Add the butter and work into the dry ingredients using a fork to combine. Continue until the mixture has a crumb-like texture. Sprinkle the mixture on top of the cake.

Bake on the middle rack of the oven for 35 minutes or until golden in color. Cool for at least 10 minutes before serving.

Saturday, August 4, 2012

Mini Apple Pie Tarts


My family's love of apple pie is something fierce.  It's amazing if they ever let me make any other pie or baked goods.  I fully blame them for my lack of baking expertise and recipes on this blog.

So, when I saw recipes using wonton wrappers to make quick little tarts, either sweet or savory, I was all over it.  It seemed like a perfect way to satisfy their cravings for apple goodness without having deal with crusts and all of that.

This recipe turned out quite nicely and made for a nice presentation for my in-laws.  The only changes I'd make is I would for sure add a sprinkle of cinnamon sugar to the wrappers before baking.

I will for sure be using the wontons for other little tarts.... savory especially.  I'm thinking something like leeks and cheese might be a good start.

Mini Apple Pie Tarts
Makes 16


1/2 cup of water
1/4 cup sugar (or less, if you don't like your pie filling super sweet)
1/2 tsp cinnamon or apple pie spice
1/2 tsp vanilla
2 tbsp flour
pinch of salt
4 small apples diced – about 2 cups
16 wonton wrappers


Preheat the oven to 375

In a small pot whisk the water, sugar, cinnamon, vanilla, and flour over medium hear. Add the apple. Stir to coat everything. The liquid should just boil and start to thicken.

Drop the heat down to medium low and cover. Cook for 12-15 minutes until the apple just softens.

Meanwhile, spray a mini muffin pan with non-stick cooking spray press the wonton wrappers in to form the crusts.  If you like your crusts sweet, sprinkle with cinnamon sugar. 

Scoop the apple mixture evenly into the wontons. Bake for about 10 minutes until the edges start to brown and get crispy.

Base recipe from Greenlitebites.com.

Friday, June 15, 2012

Asian Grilled Salmon


No witty story behind this one.  I had salmon and needed to use it up before it followed in the footsteps of a few of my in-the-freezer-so-long-you-can't-pass-it-off-as-good proteins lately.  Once I first got a deep freeze, I sort of lost track of expiration dates and had a few "Um, what's with the chicken?" meals.  So, I wanted to make sure that didn't happen again. 
 

The recipe is super simple and delicious.  I used a grill pan instead of grilling it outdoors, but I'm sure it would be just as good in a skillet, too.

My salmon didn't have a skin, which didn't present with a problem on the grill pan.  I also didn't let it rest, like the recipe suggests (I didn't even see that part until writing this blog entry), so if you want it hot, go right ahead and serve that sucker up.

Asian Grilled Salmon
Serves 6

1 side fresh salmon, boned but skin on (about 3 pounds)
2 tablespoons Dijon mustard
3 tablespoons soy sauce
6 tablespoons olive oil
1/2 teaspoon minced garlic


 Oil the grill or spray the grill pan with cooking spray and then heat the grill/grill pan (or skillet) on medium-high.

While the grill is heating, lay the salmon skin side down on a cutting board and cut it crosswise into 4 equal pieces. Whisk together the mustard, soy sauce, olive oil, and garlic in a small bowl. Drizzle half of the marinade onto the salmon and allow it to sit for 10 minutes.

Place the salmon skin side down on the hot grill; discard the marinade the fish was sitting in. Grill for 4 to 5 minutes, depending on the thickness of the fish. Turn carefully with a wide spatula and grill for another 4 to 5 minutes. The salmon will be slightly raw in the center, but don't worry; it will keep cooking as it sits.

Transfer the fish to a flat plate, skin side down, and spoon the reserved marinade on top. Allow the fish to rest for 10 minutes. Remove the skin and serve warm, at room temperature, or chilled.


Wednesday, June 13, 2012

Thai Vegetable Rice Noodles

Photo via Cooking Light

If you read my blog you'll know that I don't get to eat what I cook very often.  As the lone vegetarian in a house full of carnivores, my choice for dinner is many times met with a squinted-up look of doubt from the masses.  Abe handles it pretty good, but I tend to make my veggie meals on the days we don't have Jimi to prevent a "It's good!  I swear.  Please try it!" conversation.

Thai food is a love that I don't get much of and when I do, it's pad Thai.  Abe and I are usually on opposite ends of the rice-or-noodle-dish spectrum, with him firmly on the rice end and me completely in love with noodle dishes (come on, noodles and a bowl... love, love, love).  So, when I saw this recipe, I thought I'd have to do an extra song and dance to sell it to him.

Surprisingly, Abe loved it.  So much that he packed up a bit to take to his mother to sample.

I had to make a few adjustments because we are a peanut-free home (sniff, sniff) and I had to swap out the fish sauce for soy sauce.

Fish sauce, for those who aren't familiar, is a great addition to not only Asian dishes, but anything that you want to give that bit of depth, like sauces or soups.  It gives dishes an umami component.  What's umami, you ask?  It's the 5th taste sense and it comes from things like mushrooms and meat.  If you don't want to get fish sauce, which keeps in the fridge for a long time, use soy sauce.

Original recipe from cookinglight.com.

Thai Vegetable Rice Noodles

 
4 ounces uncooked flat rice noodles (pad Thai noodles) ( or any rice noodles)
1 cup thinly sliced radishes 
1/2 cup chopped green onions
1/2 cup chopped fresh basil
1/2 cup fresh cilantro leaves
1/4 cup fresh mint leaves
2 tablespoons fresh lime juice
1 tablespoon Thai fish sauce (or soy sauce)
2 tablespoons peanut oil (or vegetable oil)
1 1/2 tablespoons grated peeled fresh ginger
6 garlic cloves, sliced
2 Thai chiles, finely chopped
1 pound snow peas, trimmed
3/4 teaspoon kosher salt
1/2 cup chopped unsalted, dry-roasted peanuts
Sesame oil, for drizzling (optional)

Cook noodles according to package directions, omitting salt and fat. Drain and rinse under cold water; drain. Place in a medium bowl. Add radishes and next 6 ingredients (through fish sauce); toss well.

Combine oil, ginger, garlic, and chiles in a large skillet over low heat; cook for 2 minutes. Increase heat to medium-high; cook an additional 1 minute or until garlic begins to brown. Add snow peas and salt to pan; cook 3 minutes or until crisp-tender, stirring occasionally. Add snow pea mixture to noodle mixture; toss well. Sprinkle with nuts and drizzle sparingly with sesame oil, if using.


Monday, June 11, 2012

The Best Chicken Marinade

Image courtesy of Google

I'm not much of a marinader (Not a real word, I am aware).  I know growing up, if your mom wanted to make a fancy meal for company, she's throw the chicken into bottled Italian dressing and call it gourmet.  Hell, that was gourmet cooking back in the era of Shake N Bake and soup can casseroles.  

So, when I started out cooking, I shunned most marinades as "too simple".  Plus, after so many years of doctored up proteins, Abe would give me some pretty serious puppy-dog-sad eyes when I'd do a simple chicken breast and get a "It was not bad" as a reward.  This girl needs more ego stroking than that!

But, alas, some days I am unprepared and don't have a recipe ready for dinner and have to scramble.  The other day I had very few ingredients and a hungry troop.  So, I decided to ask Chef Google what he thought I should do and "marinade those breasts" came up.

Chicken breasts... chicken breasts, people.

It seemed a weird combo, but I nervously presented it to the boys and then waited.  Abe took a bite.. and then another and then declared it delicious and moist and told me to make sure to add it to the regular rotation.   He mentioned it twice again, which is always a ringing enforcement of a recipe.

This recipe is cut in half.  People were recommending to make a big batch and keep it refrigerated for up to a week.  Reviews said they used it for chicken, pork and beef.  I might even try it on grilled mushrooms.

Perfect for the grilling season.  Recipe from Allrecipes.com.


Perfect Chicken Marinade
Makes 16 servings

3/4 cup vegetable oil
1/4 cup and 2 tablespoons soy sauce
1/4 cup Worcestershire sauce
1/4 cup red wine vinegar
2 tablespoons and 2 teaspoons lemon juice
1 tablespoon dry mustard
1/2 teaspoon salt
1-1/2 teaspoons black pepper
3/4 teaspoon finely minced fresh parsley

 In a medium bowl, mix together oil, soy sauce, Worcestershire sauce, wine vinegar, and lemon juice. Stir in mustard powder, salt, pepper, and parsley. Use to marinate chicken before cooking as desired. The longer you marinate, the more flavor it will have. 


Wednesday, March 28, 2012

1-Minute Frozen Yogurt


Photo courtesy of Jamie Oliver

You know those nights when you're craving something sweet and cold late at night, but just can't justify getting into your car for a DQ run? Not to mention the calories-guilt when you're done binging?

Don't ask me how I know about this.....

Well, here is a quick and healthy way to keep the ice cream cravings at bay.

All you need are a blender, frozen berries, yogurt (I used plain Greek) and some honey.  How simple is that?

I got this from Pinterest and Jamie Oliver.

If you have a blender like mine (read: crappy), you will need to stop a few times to mix it together.  I swear to myself every time I make something in the blender that I will invest in a new one.

Add honey/maple syrup to taste.  Use the minimum if you like a tarter yogurt and more if you like it sweeter.  You know, rocket science and all.  You can make without the mint, but it really adds a nice flavor and freshness.

1-Minute Frozen Yogurt
Serves 2

1 cup yogurt (I used plain Greek, but use any that you have)
2 cups frozen berries
1 cup fresh berries (I used blueberries)
2-3 tablespoon honey or real maple syrup
1/4 teaspoon vanilla
A few Mint sprigs

Add 2 serving glasses to the freezer.

When glasses are nice and cold, add yogurt, mint and honey (or maple syrup) to blender.  Blend.  Add frozen berries and blend until combined.

Add fresh berries to the bottom of each glass and top with frozen yogurt and serve.


Related Products:


Monday, March 26, 2012

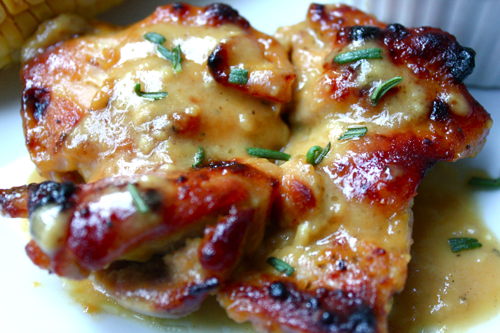
Man-Pleasing Chicken

Courtesy of Witty in the City

Much like with Angry Chicken, I was compelled to make this dish solely on the name.  I mean, come on... I've got a man.... I'm trying to please him..... it appeared to be a no-brainer.  It didn't hurt that I was low on supplies and it had only 4 ingredients, all ones that I had.

Scary simple, just mix 3 ingredients together, pour over the chicken and bake.

Abe's reaction?  "Um, this chicken IS man-pleasing!"   And then proceeded to eat the extra I had made for the following day's lunch.

That's Man for Yummy.

I used bone-in thighs, but you can easily adjust to use boneless or breasts.  Just make sure to adjust your time down.  Use a meat-thermometer to check your temps.

I got this recipe from a blog called Witty in the City.

Man-Pleasing Chicken
Serves 3

1 1/2 pounds of bone-in chicken thighs
1/2 cup  dijon mustard
1/4 cup maple syrup (the real stuff)
1 tablespoon rice wine vinegar (or cider vinegar)

Preheat oven to 450. Place chicken in a baking dish.  Combine the mustard, maple syrup and vinegar in a bowl and pour over chicken, flipping chicken to coat.

Bake, uncovered, for 40 minutes or until meat thermometer reads 180 degrees.

Let rest for 5 minutes. Sprinkle with fresh rosemary, if you feel so inclined.